Skincare Routine for Men: A Complete Guide (2026)
Introduction
The internet is flooded with guides on skincare routine for men.
“5-Step Men’s Skincare Routine,” “Dermatologist-Recommended Men’s Skincare,” “Best Men’s Skincare Products of 2026 — TOP 10.” Click on any of them and you know what you’ll find. Use a cleanser, apply moisturizer, don’t forget sunscreen. Product links follow. That’s it. You close the tab. And nothing changes.
Why is that?
Why Most Men’s Skincare Guides Fail
It’s like handing someone who’s never cooked a recipe and calling it a day.
“A pinch of salt, medium heat, 3 minutes.” Sure. But if you don’t know why the salt goes in, what medium heat actually means, or how to tell when 3 minutes is up — the recipe is just paper. You follow it exactly, something goes wrong, and you go looking for a different recipe. That one fails too, so you look for another. Your cooking doesn’t improve. You just end up with fifteen recipe tabs open.
Skincare is no different. Most guides start with the conclusion. Use this product. Apply in this order. This one is great. The “why” is buried in a dermatologist quote, some positive reviews, or a few lines of ingredient jargon nobody understands.
The problem is that skin varies from person to person. Someone else’s perfect routine could be a disaster for yours. And you don’t know why. Without knowing why, the only option is to go hunting for the next recommendation. The cycle repeats. Money goes out, time goes out, and your skin suffers through product after product.
Your skin isn’t too sensitive. You just learned it in the wrong order.
Why You Should Read This Guide
This guide to men’s skincare routine doesn’t start with product recommendations.
It starts with what your skin looks like, how it works. What a cleanser actually does to your skin. How each moisturizer ingredient operates. Why sunscreen is the most underrated anti-aging product in existence. Know this, and you can make your own calls — when choosing a product, trying something new, or troubleshooting a breakout.
The goal is simple: to make you think for yourself.
Not to turn you into a superfan of any particular brand. Not to complete a 10-step routine. Just to understand your own skin and make decisions that fit it. As a bonus: less money wasted on the wrong products, a clearer sense of where to start when something goes wrong, and the ability to read an ingredient list and know whether it’s a match.
How to Use This Guide
This guide is long. Fair warning.
You don’t need to read it front to back in one sitting. Nobody would.
If you’re just starting out with skincare routine for men, read Part 1 in order. Without understanding basic skin structure, everything that follows will feel like a random list of facts. The foundation has to come first.
If you already have a routine but it’s not working, jump to Part 2. It covers the principles and selection criteria for cleansers, moisturizers, sunscreen, and treatments. The clue to what’s going wrong is probably there.
If you have a specific concern, find the relevant section in Part 3. Acne, hyperpigmentation, shaving irritation — each gets its own treatment.
Each section is written to stand on its own. Bookmark it and use it like a reference whenever you need it.
One thing to remember before you start: skincare isn’t complicated. You just haven’t been taught it in the right order.
Part 1. The Basics: Understanding Your Skin
Chapter 1. What Is Skin, Exactly?
Before you pick a single product, you need to understand what it’s working on — your skin.
Skin isn’t just a wrapper. It’s the body’s largest organ, covering roughly 1.5 to 2 square meters and accounting for about 15% of your body weight. Bigger than your brain, heavier than your liver. And yet most of us drag a bar of soap across it every morning without a second thought.
The 3-Layer Structure: Epidermis, Dermis, and Hypodermis
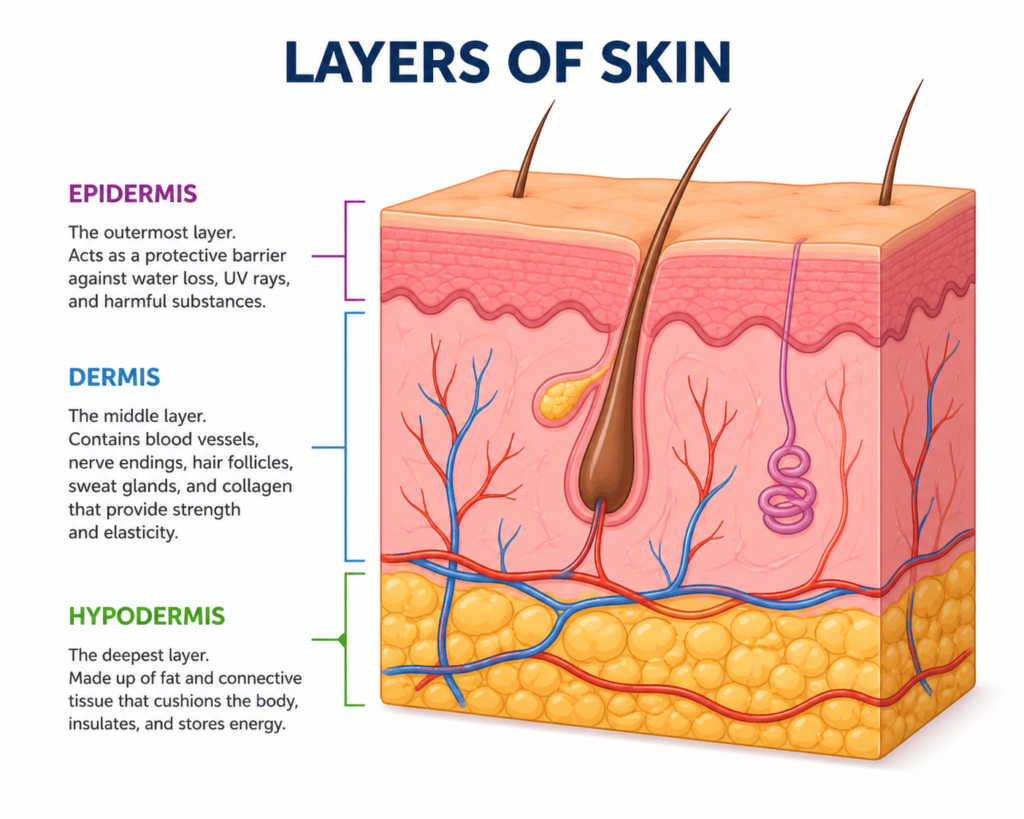
Skin is made up of three layers, from outside in. Think of a house: the roof, the walls and internal structure, and the foundation.
The epidermis is the roof. About 0.1mm thick — roughly one hair’s width. Unbelievably, this thin layer blocks bacteria, UV rays, and pollutants all day long. While you’re watching Netflix. While you’re asleep. Cells inside the epidermis are constantly being made and pushed upward, shedding as dead cells after roughly 28 days. Your face quietly gets replaced, piece by piece, once a month. Did you know that?
The dermis is the walls and internal structure. It’s 15 to 40 times thicker than the epidermis and makes up most of your skin’s volume. It’s packed with collagen and elastin — the structural materials that give skin its firmness and elasticity. Blood vessels, nerves, hair follicles, and sebaceous glands all live here. When those sebaceous glands go into overdrive, your forehead is shiny before lunch. As collagen breaks down and elastin loses its spring with age, this structure gradually sags. That’s where wrinkles come from. And it’s where ingredients like retinol and peptides are ultimately aiming when they claim anti-aging effects.
The hypodermis is the foundation. Made of fat cells, it absorbs impact and holds in heat. It has almost nothing to do with skincare. No matter how expensive your cream is, it doesn’t reach this layer. Getting something to happen here requires injections or procedures. If a product claims otherwise, that’s a marketing line.
The Stratum Corneum: Where Skincare Actually Happens
The outermost layer of the epidermis has its own name: the stratum corneum. About 0.02mm thick. This is where skincare’s battles are fought.
The stratum corneum is made entirely of dead cells. Flat, dense corneocytes stacked 15 to 20 layers deep, with lipids filling the gaps between them like mortar. Dermatologists call this the “brick and mortar model.” The corneocytes are the bricks; the lipids are the mortar.
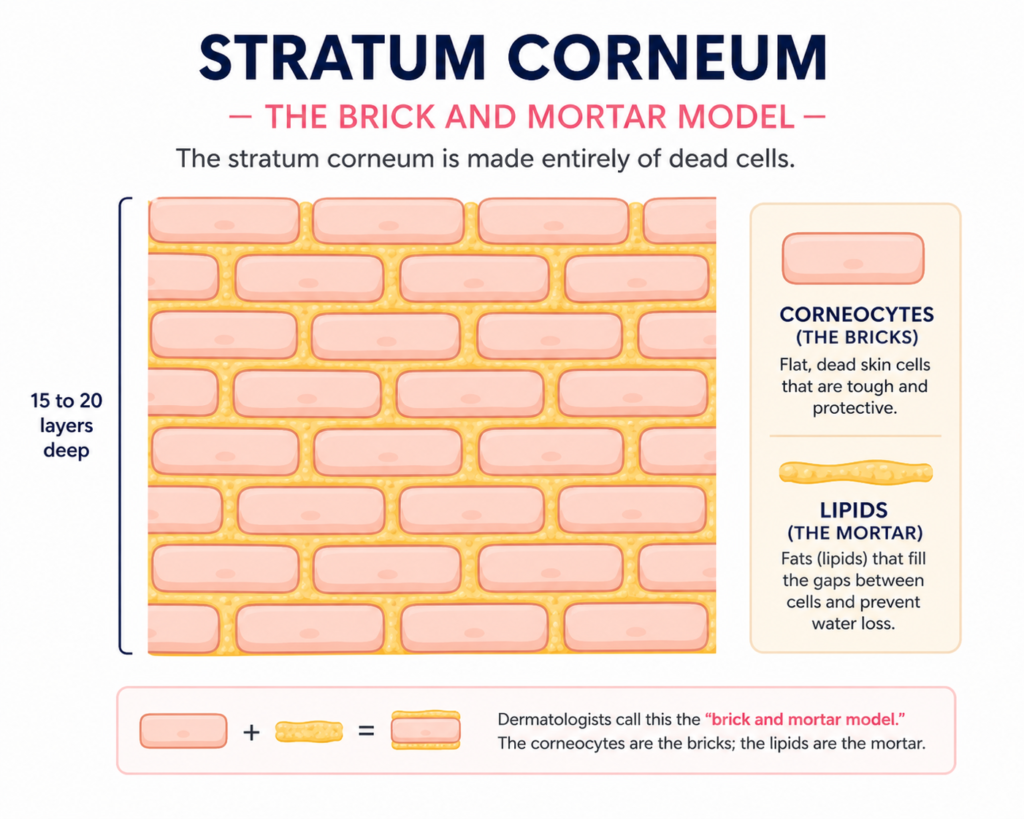
Dead cells might sound like useless debris. But this “debris” does quite a lot. It blocks external substances from getting in and stops moisture from leaking out. One of the first dangers for a patient with severe burns is moisture loss and infection — exactly what happens when this layer disappears.
Most of the skincare products you apply work at the stratum corneum level, or at most the lower epidermis. When ads claim a product “penetrates to the dermis,” if that were literally true, it would be classified as a drug, not a cosmetic. Keeping the stratum corneum in good shape is enough to make a visible difference. That’s the realistic scope of skincare — and it’s sufficient.
The Skin Barrier: What You Need to Protect
The skin barrier refers to all the protective functions the stratum corneum performs. Structurally, it’s the brick-and-mortar arrangement of corneocytes and the lipid mixture that fills the spaces between them.
The composition of those lipids matters. When ceramides, cholesterol, and fatty acids exist in a balanced ratio, the barrier functions best. When that balance breaks down, the barrier develops cracks and problems start in two directions.
From the inside out: moisture escapes in excess. This is called transepidermal water loss (TEWL) — an objective measure of skin barrier integrity. When TEWL increases, skin dries out, tightens, and feels rough. From the outside in: irritants penetrate more easily. Ingredients and environmental stimuli that never used to bother you suddenly trigger reactions — stinging, redness, itching. Much of what gets labeled “sensitive skin” is actually a damaged barrier. Not inherent sensitivity, but a broken defense that can’t hold the line.
The skin barrier is damaged by: over-cleansing, alkaline soaps, over-exfoliation with physical scrubs, UV exposure, and dry conditions. And whether you like it or not, lipid production naturally declines with age.
Protecting the barrier comes down to three things: reduce irritation, replenish lipid ingredients from outside, and prevent moisture from escaping. That’s essentially the entire logic of skincare.
The Acid Mantle and pH: Why Soap Is a Problem
On the surface of the stratum corneum sits a thin, invisible film — the acid mantle.
Sebum, sweat, and byproducts from the breakdown of stratum corneum cells combine to keep the skin’s surface mildly acidic. Healthy skin has a pH of 4.5 to 5.5 — below the neutral 7, in the mildly acidic range.
A quick note on pH: it runs from 0 to 14. Seven is neutral, below 7 is acidic, above 7 is alkaline. And the scale is logarithmic. A difference of 1 means a tenfold difference in acidity. pH 4 vs. pH 6 is a hundredfold difference. Small numbers, big gap. This matters more than it sounds.

Three reasons the skin needs to stay mildly acidic:
First, it optimizes barrier synthesis. The enzymes that build the stratum corneum’s lipids work best in a mildly acidic environment. When pH rises, these enzymes slow down, ceramide synthesis drops, and the barrier loses its ability to repair itself.
Second, it normalizes skin cell turnover. The enzymes that naturally break down dead skin cells also prefer mildly acidic conditions. When pH rises, this process gets disrupted — cells don’t shed evenly, and skin texture turns rough.
Third, it maintains microbial balance. A mildly acidic environment supports the skin’s healthy microbial ecosystem. Some pathogenic bacteria thrive as pH increases. S. aureus, associated with eczema and atopic conditions, multiplies more readily when the skin becomes less acidic.
So what’s the pH of regular soap? Around 9 to 11 — alkaline. The moment soap hits your skin, the surface flips alkaline. The skin tries to recover, but research suggests it takes 1 to 2 hours. Repeated alkaline exposure means the skin never fully gets back to baseline before the next wash — and in the meantime, barrier synthesis and microbial balance stay disrupted.
That tight, squeaky-clean feeling after washing your face? A lot of people interpret that as a sign of a thorough cleanse. It isn’t. It’s mostly moisture and lipids stripped away. We’ve been mistaking discomfort for freshness for decades.
The Skin Microbiome: The Ecosystem on Your Face
There is a living ecosystem on the surface of your skin.
Thousands of species, trillions of microorganisms — bacteria, fungi, viruses — live on your skin right now. This is the skin microbiome. At this very moment, millions of microbes are on your face. That might sound alarming. But without them, your skin would be in worse shape.
These aren’t just passive hitchhikers.
Beneficial microbes crowd out pathogens simply by occupying space. Some secrete antimicrobial substances that suppress harmful bacteria. They communicate constantly with immune cells beneath the epidermis, modulating inflammatory responses. They also secrete organic acids that help maintain the acid mantle. They are, functionally, part of the skin’s defense system.
And this ecosystem is more fragile than you’d expect. Antibacterial cleansers, alcohol-based toners, strong surfactants — none of these discriminate. They take out beneficial microbes along with the harmful ones. Trying to sterilize your skin does more harm than good.
The goal of cleansing isn’t to eliminate all bacteria. It’s to remove excess debris and sebum while disturbing the ecosystem as little as possible. Guard the door, but don’t evict the residents. That balance is what matters.
That covers skin’s basic structure: three layers, the stratum corneum, the skin barrier, the acid mantle, and the microbiome. Understanding these five things makes everything that follows much clearer. Next, we look at how skin differs from person to person — in other words, skin types.
Chapter 2. Know Your Skin Type
Flip over any skincare product or check a brand’s website and you’ll see it: “For dry skin.” “Recommended for oily skin.” “Suitable for all skin types.” Skin type is treated as the starting point for everything. Know your type, find the right product.
That’s not wrong. The problem is that most people misidentify their skin type.
Thinking you’re dry when you’re actually oily. Or thinking you’re oily when the real issue is a damaged barrier on dry skin. Building a routine around the wrong skin type means no product — however good — will work as intended. This chapter is about identifying your skin type correctly, starting with a distinction that trips most people up.
Skin Type vs. Skin Condition: Why the Difference Matters
Skin type is something you’re born with. It’s determined by genetics and hormones, and it primarily reflects how much sebum your skin produces. The main categories: dry, oily, and combination. It doesn’t change completely over your lifetime, though it can shift gradually with age, hormonal changes, or climate.
Skin condition is what your skin is going through right now. It’s temporary and shaped by outside factors — season, stress, a flawed skincare routine, diet, sleep. Two people with the same skin type can have very different skin conditions.
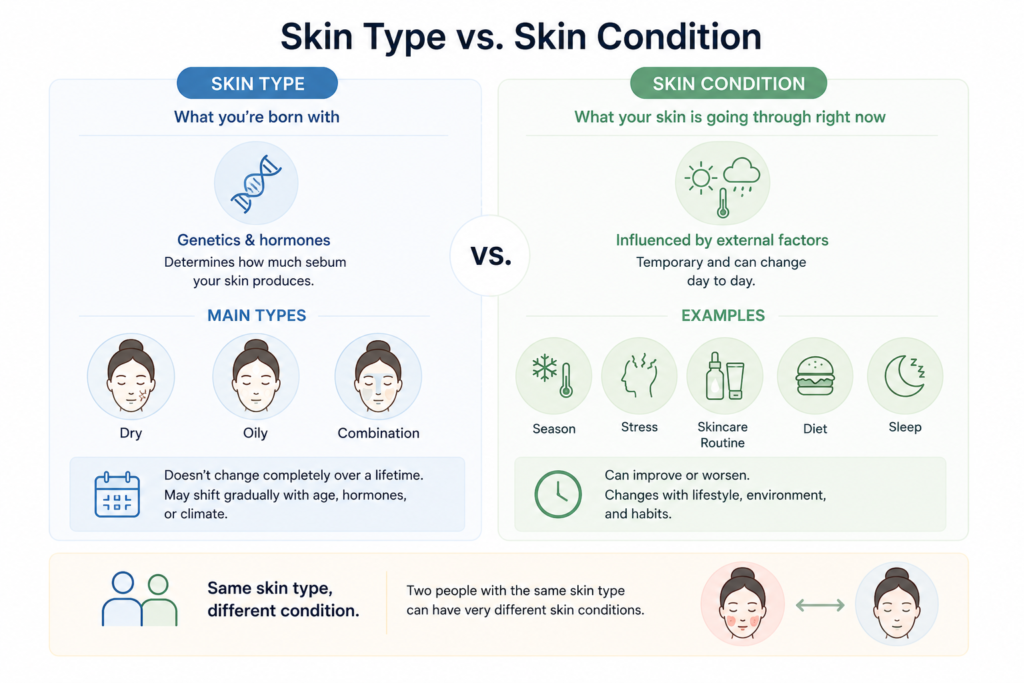
Why does this distinction matter? Because confusing the two leads to wrong product choices.
Here’s the most common mix-up: your face feels tight and dry after washing, so you assume you have dry skin. But that happens with oily skin too — if the barrier is damaged and moisture is escaping. Handing that person a rich moisturizer made for dry skin could clog their pores and trigger breakouts. On the flip side, assuming everything is oily and using only oily-skin products can make the barrier worse, which makes skin produce more oil. A vicious cycle.
Skin type = how much sebum you produce. Skin condition = how healthy your barrier currently is. Read them separately, and your product choices get much more precise.
Dry Skin: Characteristics, Causes, and Principles
Characteristics
Dry skin produces less sebum. Sebum acts as a natural occlusive, and when it’s scarce, moisture evaporates quickly from the skin’s surface. The result: lower water content in the stratum corneum.
Signs to look for: skin tightens and feels constricted shortly after washing, even with nothing applied. Texture is rough; skin flakes easily. Pores are barely visible. No oiliness throughout the day. Makeup lifts or cracks.
Dry skin tends to worsen with age, since sebum production naturally declines. It’s common to have normal skin in your twenties and shift to dry by your thirties or forties.
Causes
The underlying cause is underfunctioning sebaceous glands — largely genetic. Environmental factors pile on: dry climates, cold wind, low humidity, excessive heating and cooling. If your skin feels especially tight in winter, your environment is amplifying what’s already there. Hot showers strip sebum too, compounding the problem.
Principles
The core goal is two things: replenish the missing moisture, and keep it from escaping. Cleanse gently, choose a moisturizer with both humectants and occlusives in a rich formula, and pick a sunscreen with hydrating ingredients. Avoid hot water. Specific product selection criteria and routines are covered in Chapter 9.
Oily Skin: Characteristics, Causes, and Principles
Characteristics
Oily skin has overactive sebaceous glands producing more sebum than the skin needs.
Signs to look for: shininess on the forehead, nose, and cheeks within hours of washing. Pores are enlarged and visible. Prone to acne and blackheads. Makeup doesn’t last. On the upside, oily skin tends to wrinkle later than dry skin — sebum provides a natural moisturizing effect. Frustrating now, but you’ll likely look younger than your peers later.
Causes
Sebum production is largely driven by androgens — male hormones. This is why men’s skin tends to be oilier than women’s, and why oil production spikes in puberty. Genetics plays the biggest role, but stress, poor sleep, and high-sugar diets can also increase sebum production, according to research. And paradoxically, a damaged skin barrier can trigger more oil production as a compensatory response.
Principles
The most common mistake with oily skin is over-cleansing — scrubbing hard and washing repeatedly to fight the shine. The skin responds by making more oil. The more you strip, the more it produces. Cleanse twice a day with a mild, pH-balanced gel-type cleanser. Keep the moisturizer light. Choose a non-shiny sunscreen. Specific selection criteria and routines are in Chapter 9.
Combination Skin: Characteristics, Causes, and Principles
Characteristics
Combination skin is actually the most common type. It doesn’t behave uniformly — different zones have different characteristics. The T-zone (forehead, nose, chin) is oily; the cheeks and around the eyes are dry or normal. The T-zone shines and shows visible pores while the cheeks feel tight or flaky.
Causes
Sebaceous gland density and activity vary by facial region. The T-zone is simply more densely packed with them. That imbalance is the essence of combination skin.
Principles
The dilemma is that one product rarely satisfies two opposite needs at once. The practical starting point is a lightweight lotion that works somewhere in the middle. As you get more comfortable, zoning your application — lighter on the T-zone, richer on the cheeks — can help. Specific selection criteria and routines are in Chapter 9.
Sensitive Skin: A Condition, Not a Type
This is where a lot of confusion happens.
Sensitive skin is not a type in the same category as dry, oily, or combination. It’s a condition. Dry skin can be sensitive. Oily skin can be sensitive.
Sensitivity means the skin overreacts to external stimuli — stinging, redness, itching, or a burning sensation in response to things that wouldn’t bother most people. Products that worked fine before suddenly cause reactions.
Two main causes:
Barrier damage type — the more common one. As Chapter 1 explained, a compromised barrier lets irritants penetrate more easily. Repeated over-cleansing, frequent scrubbing, and alkaline products can break down the barrier over time, making skin reactive. Fix the barrier and the sensitivity often improves.
Neurogenic type — where the barrier is intact but the skin’s sensory nerves are hypersensitive. Rosacea is the classic example. Barrier repair alone doesn’t solve this; dermatological consultation is often needed.
One guiding principle for sensitive skin: start with simple products. The more ingredients a formula has, the harder it is to identify what caused a reaction. Fragrance, alcohol, and strong surfactants are the usual culprits. Fragrance-free and alcohol-free products should be your default.
How to Identify Your Skin Type at Home
Enough theory. Here’s the practical part.
The most reliable method you can do at home is the bare face test.
Step 1. Wash your face with your usual cleanser. Apply nothing afterward — no toner, no moisturizer, nothing.
Step 2. Wait 30 minutes. Don’t do anything special.
Step 3. Stand in front of a mirror. Press gently on your forehead, nose, cheeks, and chin with your fingertips.
Reading the results:
- Overall shine + oil on your fingers → Oily skin
- Overall tightness + visible flaking → Dry skin
- Shiny T-zone + tight cheeks → Combination skin
- No shine, no tightness, just comfortable → Normal skin. You’ve hit the jackpot.
- Tightness and redness immediately after washing → Your cleanser is probably too harsh. That’s the first thing to change.
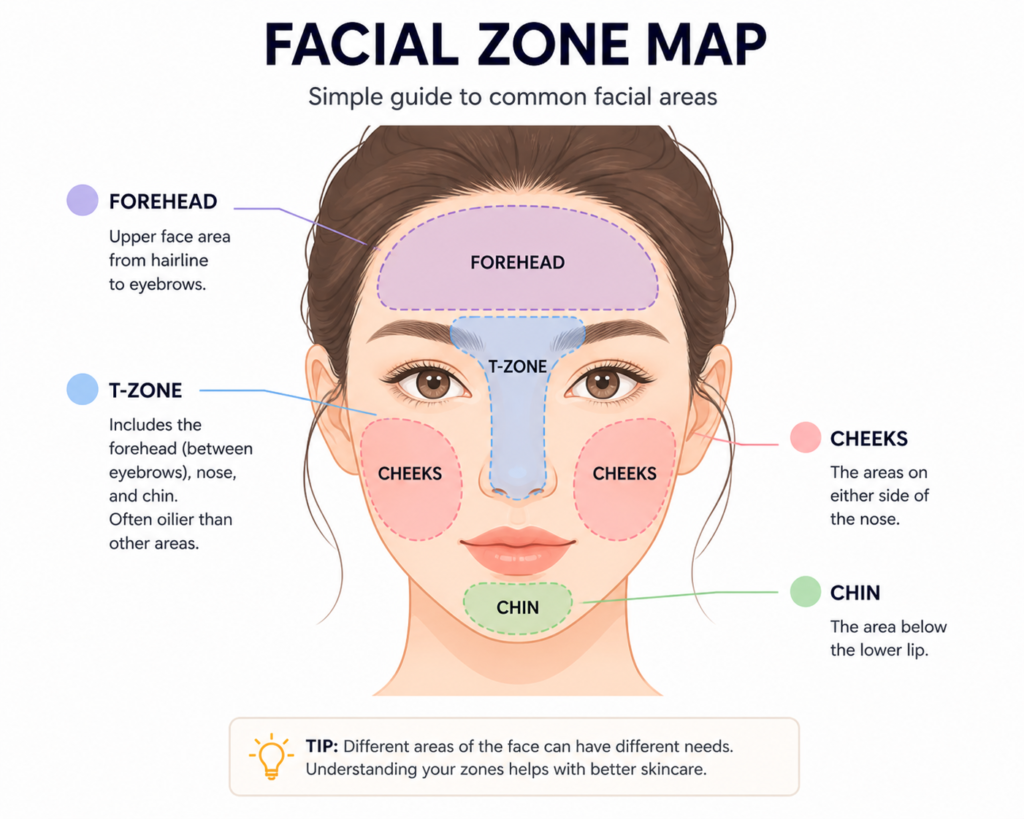
A note on testing conditions: results can be skewed if you use a different cleanser than usual, if you drank heavily the night before, or if the environment is unusually dry. Test on an ordinary weekday morning. And don’t draw conclusions from a single test — repeat it over a few days to find the pattern.
Once you know your skin type, the next tool you need is the ability to read an ingredient list.
Chapter 3. How to Read an Ingredient List
When most people shop for skincare, they read the front of the package. Brand name, clean design, “Contains Hyaluronic Acid,” “Dermatologist Tested,” “48-Hour Moisture.” That’s what sells.
The back is harder to read. Small print, unpronounceable names, a long list that makes your eyes glaze over. Easier to just trust it.
But the real information is on the back. The front is marketing; the back is fact. Learn to read an ingredient list and you can see through any product — why it’s expensive, or why it has no business being expensive.
It’s not hard. You just need a few rules.
What Is an INCI Name?
The names on a cosmetic ingredient list follow the INCI system — International Nomenclature of Cosmetic Ingredients. It’s a standardized global naming convention. Whether you buy a product in the US or Korea, hyaluronic acid will appear as Sodium Hyaluronate or Hyaluronic Acid.
The upside: learn these names once and they apply everywhere. And no matter how elegant a brand name sounds, the ingredient list reveals what’s actually inside. If “Revitalizing Moisture Complex” turns out to be mostly glycerin and water, you’ll know.
The Order Rule: What’s Listed First Is What Matters
Ingredients are listed in descending order of concentration. Components present at 1% or less can appear in any order, but anything above that goes from highest to lowest.
What this means in practice: imagine a moisturizer whose first five ingredients read:
Water, Glycerin, Cetearyl Alcohol, Caprylic/Capric Triglyceride, Ceramide NP…
Water first means water is the primary ingredient — true of most water-based products. Glycerin second means a meaningful amount of glycerin. Ceramide NP in fifth place, if the full list runs twenty ingredients long, is still relatively prominent.
Now flip the scenario. The front says “Contains Ceramides” in large text, but you find Ceramide NP near the very end. That means it’s there in trace amounts — enough to put on the label, not enough to do much. That said, it depends on the ingredient. Some, like retinol or salicylic acid, are effective in small amounts. Others, like ceramides, need to be present in meaningful quantities to work.
The rule: focus on the first five ingredients. That’s the real product.
Active Ingredients vs. Inactive Ingredients
A useful distinction to know before reading ingredient lists: active ingredients versus inactive ingredients.
Active ingredients are what actually produce the product’s intended effect — blocking UV rays, exfoliating dead cells, treating acne. Inactive ingredients are what make the formula work: water, emulsifiers, preservatives, thickeners. “Inactive” doesn’t mean useless. They support the delivery of actives. Think of them as the stage crew.
Products regulated by the FDA — like sunscreen — are required to list actives and inactives separately. Flip a sunscreen bottle and you’ll see “Active Ingredients: Zinc Oxide 20%” listed at the top. Regular cosmetics don’t have this requirement; everything is just listed by concentration.
Why does this matter? Because with active ingredients, concentration determines effect. Niacinamide has been studied at 5% and above. Salicylic acid works as an exfoliant in the 0.5–2% range. Being present is not the same as being present at a useful level.
Marketing Ingredients vs. Working Ingredients
The cosmetics industry has an unspoken practice: add a tiny amount of a desirable-sounding ingredient, then put it front and center in the product name and marketing copy.
“Gold-Infused Serum.” Check the ingredient list and Gold appears at the very bottom — probably less than 0.001%. “Truffle Extract Face Cream.” The truffle is in there. But evidence of what it actually does to skin is essentially nonexistent.
These are marketing ingredients. They exist to sell the product. They’re not inherently harmful — just not worth expecting anything from.
Then there are working ingredients — those with documented evidence of effectiveness. These need to be present in sufficient amounts and should appear near the top of the list.
A reference list of ingredients worth knowing:
Moisturizing: Glycerin, Hyaluronic Acid / Sodium Hyaluronate, Urea, Panthenol
Barrier support: Ceramide NP / AP / EOP, Squalane, Cholesterol
Anti-aging: Retinol, Retinal, Ascorbic Acid (Vitamin C), Niacinamide, Peptides
Exfoliation: Glycolic Acid, Lactic Acid, Salicylic Acid
UV filters: Zinc Oxide, Titanium Dioxide, Oxybenzone, Avobenzone
Ingredients to Watch Out For
First, a note: the internet is full of “Top 10 Skincare Ingredients to Avoid at All Costs” lists. Most are overblown. Safety depends on concentration and context. Even water is lethal in excessive amounts.
That said, some ingredients warrant caution for certain skin types.
Fragrance (Fragrance / Parfum): The most common irritant for sensitive skin. Fragrance is a blend of dozens of chemical compounds, and brands aren’t required to disclose the full composition. If your skin is sensitive, fragrance-free is the default.
Alcohol (Alcohol Denat. / SD Alcohol): Can worsen dryness, especially in dry or sensitive skin. If alcohol appears near the top of the ingredient list, proceed carefully. Note that fatty alcohols like Cetearyl Alcohol and Cetyl Alcohol are different — despite the name, they’re moisturizing ingredients, not irritants.
Sulfate surfactants (Sodium Lauryl Sulfate, SLS): Strong cleansing agents that produce abundant lather, but are relatively irritating. Not ideal for dry or sensitive skin. Check cleanser ingredient lists.
Coconut Oil: Often assumed to be universally beneficial because it’s “natural.” But it has a strong tendency to clog pores. Better avoided by oily or acne-prone skin.
Patch Testing: Before You Apply Anything New
You’ve read the ingredient list. The product looks fine. Time to apply it all over your face?
Not yet. Patch test first.
Apply a small amount to the inside of your wrist or behind your ear and wait 24 to 48 hours. Sensitive skin types should wait up to 72. No redness, itching, or stinging? You’re clear. If there’s a reaction, that product isn’t right for your skin. To find the culprit, look at the ingredient list and identify what’s new compared to products you’ve used without issue.
It takes 30 seconds and can prevent days of breakouts. It’s especially important when introducing actives like retinol or AHAs/BHAs for the first time.
One at a Time: Why You Shouldn’t Change Multiple Products at Once
One final rule. When introducing a new product, change one thing at a time.
The reason is simple: if something goes wrong, you need to be able to isolate the cause. Change your cleanser, moisturizer, and serum at the same time, and a breakout could be from any of them. Change one, wait 2 to 4 weeks, assess, then move on to the next. That’s how you figure out what actually works for your skin.
Skin also needs time to adjust. Some mild irritation in the first one to two weeks isn’t necessarily a sign of incompatibility — think slight dryness, occasional flaking, or a faint tightness, particularly with retinol or AHAs. Don’t give up too early — especially with something like retinol, where an adjustment period is expected. Two to four weeks is the minimum before drawing conclusions. Persistent redness, stinging, or swelling, on the other hand, are signals to stop.
That’s the end of Part 1. Skin structure, skin type, and reading ingredient lists. With these three things in place, you’re ready to talk about actual products. Part 2 breaks down the core men’s skincare routine steps — cleanser, moisturizer, sunscreen, and treatment — one by one.
Part 2. The 4-Step Framework: What, Why, and How
Chapter 4. Cleanser: Where It All Starts
Of all the steps in a men’s face care routine, the cleanser is the least glamorous.
Serums feel cutting-edge. Sunscreen has a sense of mission. Retinol makes you feel like a dermatologist in training. Cleanser? You’re just washing your face. Nothing exciting.
But get the cleanser wrong and nothing else matters. Applying even the best serum onto a damaged skin barrier is pouring water into a broken bucket. There’s a reason skincare starts here.
The Cleanser’s Job: Nothing More, Nothing Less
A cleanser has one job: removing surface debris, excess sebum, and makeup or sunscreen residue from the skin. Loosened dead skin cells may come off in the process, but exfoliation is not what a cleanser is for.
Feeding skin, treating it, reversing aging — not the cleanser’s department. A cleanser is on your skin for a minute, maybe two. The idea that its ingredients absorb and do something meaningful in that time is mostly marketing.
What actually matters in a cleanser is not the ingredient lineup, but how little it disrupts. Clean effectively while leaving the barrier as intact as possible. That’s the standard.
How Surfactants Work: The Bridge Between Oil and Water
Some things on your skin won’t wash off with water — sebum, sunscreen, pollutants. They’re oil-based and repel water. Water alone leaves them behind.
That’s where surfactants come in.
A surfactant molecule has two ends: one that loves water (hydrophilic), one that loves oil (lipophilic). The lipophilic end grabs oily residue on the skin; the hydrophilic end bonds with water. Rinse and the oily debris rides off with the surfactant.
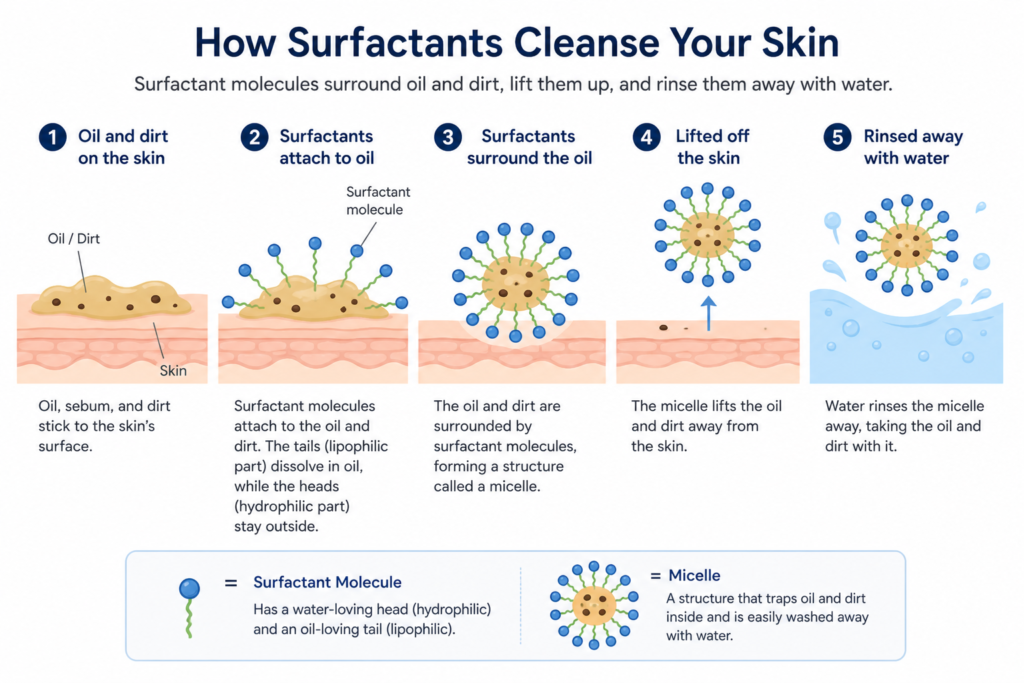
The problem: surfactants don’t discriminate. They can strip the lipids that make up the skin barrier along with the dirt. The stronger the surfactant, the better it cleans — and the more damage it can do. This tradeoff is the central question in choosing a cleanser.
SLS (Sodium Lauryl Sulfate) is the classic example of a strong surfactant — abundant lather, effective cleaning, but harder on the barrier. Gentler alternatives include Cocamidopropyl Betaine and Sodium Cocoyl Isethionate — slightly less cleansing power, significantly less irritation.
More lather doesn’t mean cleaner. Lather is psychological satisfaction. Your skin doesn’t care how much foam there is.
pH and Skin: Why Mildly Acidic Is the Answer
As covered in Chapter 1, healthy skin sits at pH 4.5 to 5.5 — mildly acidic. Regular soap runs at pH 9 to 11, which is alkaline. Washing with it flips the skin’s pH and disrupts the acid mantle. Recovery takes time.
This is why a mildly acidic cleanser (pH 4.5–6) is the right choice. A cleanser that matches the skin’s natural pH causes far less disruption. You can verify a product’s pH on the brand’s website, or use pH test strips at home — a few dollars will get you a full pack.
Types of Cleansers: Foam, Gel, Oil, Milk, and Bar
Foam: The most common format. Produces abundant lather and leaves skin feeling refreshed. Good cleansing power — best for oily skin; can be too stripping for dry or sensitive skin.
Gel: Clear or translucent. Less lather than foam but effective cleaning. Good for oily and combination skin. Light, clean finish.
Oil: Excellent at dissolving oil-based debris — makeup and sunscreen especially. Works well for dry skin. Frequently used as the first step in a double cleanse.
Milk / Cream: Contains moisturizing ingredients and is gentler on the skin. Lower cleansing power, but the least irritating format. Best for dry or sensitive skin.
Bar: Convenient, but most bar soaps have high pH. pH-balanced bar cleansers exist — just verify the pH before committing.
Choosing a Cleanser by Skin Type
Take the skin type you identified in Chapter 2 and apply it here.
Dry skin: Cream or milk type, mildly acidic, gentle surfactants. No tightness after washing. Avoid SLS.
Oily skin: Gel or light foam, mildly acidic. Enough cleansing power, but not excessive. A cleanser with a small amount of salicylic acid can help with pore-clearing, though since cleansers rinse off quickly, the effect is more limited than a leave-on product.
Combination skin: Gel or light foam. Enough cleaning for the T-zone without irritating drier areas.
Sensitive skin: No fragrance, no alcohol, gentle surfactants, mildly acidic. Simpler is better. Cream or milk formats are safest.
Double Cleansing: Do You Need It?
Double cleansing means first washing with an oil-based cleanser or cleansing balm, then following up with a water-based cleanser. The method was popularized by K-beauty.
When it’s worth it: if you’ve worn high-SPF sunscreen, heavy-duty makeup, or long-wear products. These often don’t come off fully with a single water-based wash. An oil cleanse dissolves the oil-based residue first; the water-based cleanser handles the rest.
When it’s not worth it: a light sunscreen day with no makeup, or for dry or sensitive skin doing a daily double cleanse. That’s over-cleansing — unnecessary stress on the barrier.
The rule: double cleanse when you’ve used a lot of oil-based products that day. Single cleanse when you haven’t.
How to Cleanse: Temperature, Time, and Frequency
Water temperature — lukewarm. Hot water can strip oil and dilate blood vessels, leading to flushing. Cold water reduces how effectively surfactants work. Lukewarm — close to body temperature — is right. The main reason to avoid hot water is the irritation risk, not the few degrees of surfactant efficiency difference.
Time — 30 seconds to 1 minute. Work up a lather in your hands, then massage gently over your face. No scrubbing. Let the cleanser do its job.
Rinsing — thoroughly. Residue left behind causes irritation. The hairline and jawline are easy spots to miss.
Drying — pat, don’t rub. Rubbing physically disrupts the stratum corneum. Press a clean towel gently to absorb water.
Frequency — twice a day. Morning and evening. Morning cleansing removes sebum and byproducts that built up overnight. If you don’t have oily skin, water alone is often enough in the morning. Evening cleansing must use a cleanser — it removes the day’s accumulated debris and sunscreen.
Cleansers aren’t glamorous. But everything in skincare starts here. Get the cleanse right and the next steps build properly. Chapter 5 covers what to put on after washing — moisturizer.
Chapter 5. Moisturizer: Moisture In, Moisture Locked
Moisturizer is the most misunderstood product in skincare.
“My skin is oily — why would I add more?” “Using moisturizer makes your skin lazy — it stops producing its own moisture.” “The more expensive the cream, the deeper it penetrates.”
All three are wrong. The laziness myth especially: the skin’s moisture production and retention mechanisms don’t change because you applied something from a bottle. If anything, consistently supporting the barrier with a moisturizer helps it function more stably, according to research.
What a moisturizer does is simple: it puts moisture in and keeps it from leaving. Understanding the mechanism makes choosing the right one straightforward.
Two Reasons Skin Gets Dry
Dry skin doesn’t have just one cause.
The first is that the skin lacks the ability to hold onto moisture. Within the stratum corneum are substances called Natural Moisturizing Factors (NMF) — amino acids, lactic acid, urea — that attract and retain water. When NMF levels drop due to age, excessive cleansing, or dry environments, the stratum corneum can’t hold moisture effectively.
The second is that moisture escapes too quickly. A compromised barrier means TEWL spikes. No matter how much moisture you add, it evaporates faster than it stays.
Most dry skin involves both happening at once. A good moisturizer needs to address both: bring moisture in and keep it there.
Humectants, Occlusives, and Emollients: Three Ways Moisturizers Work
Moisturizer ingredients fall into three functional categories. Knowing these makes ingredient lists readable.
Humectants draw water in. They have molecular structures that attract water — from the air or from deeper layers of skin — and hold it in the stratum corneum.
The key players are hyaluronic acid and glycerin. Hyaluronic acid can reportedly hold up to 1,000 times its weight in water — a claim marketing uses heavily. It works, but standard hyaluronic acid molecules are large enough that they primarily function at the surface of the stratum corneum rather than penetrating deeply. Glycerin is much cheaper, absorbs faster, and research suggests it performs comparably. Expensive doesn’t always mean better.
One caution: humectants used alone can backfire in very dry conditions. Instead of pulling moisture from the air, they may draw it up from deeper skin layers, accelerating evaporation. This is especially noticeable in dry winter conditions or climate-controlled indoor environments. That’s why occlusives need to follow.
Occlusives form a physical barrier on the skin’s surface that slows evaporation.
Petrolatum (Vaseline) is the best-studied example — one of the most effective at reducing TEWL of anything available. “That greasy stuff?” Yes. Cheap, heavy, shiny, and weirdly unglamorous. But from a dermatological standpoint, petrolatum is among the most efficient occlusives ever found, reducing water loss through the epidermis by nearly 99%. Minimal irritation, rare allergic reactions. Dermatologists use it routinely for damaged barrier recovery. The evidence that expensive creams outperform it isn’t as strong as you might think.
The downside is texture — too heavy for most daily facial use. Most moisturizers blend in a small amount of occlusive rather than applying it straight. Other occlusives: shea butter, squalane, dimethicone.
Emollients fill the spaces between stratum corneum cells, softening skin texture and smoothing the surface.
Ceramides, squalane, and plant-based oils fall here. Ceramides are particularly significant: they’re actual structural components of the skin barrier. Replenishing them from outside contributes directly to barrier repair. If your skin is dry or reactive, a ceramide-containing product is a strong first choice.
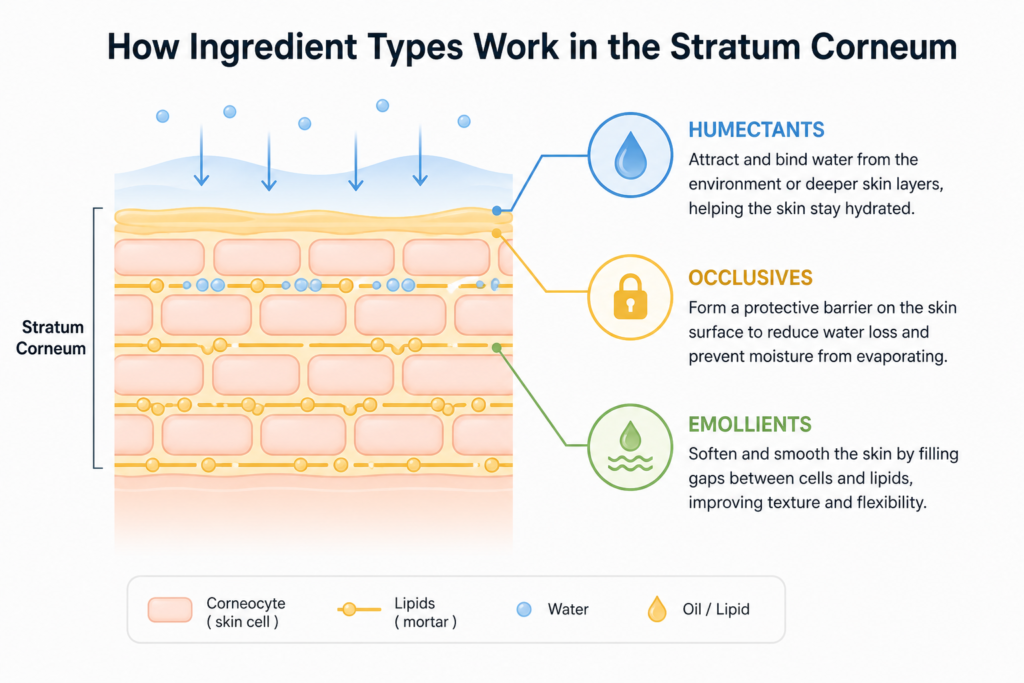
What Makes a Good Moisturizer
An ideal moisturizer contains all three: humectants, occlusives, and emollients — something to draw moisture in, seal it, and fill the structural gaps. The better-reviewed moisturizers on the market, when you look at their ingredient lists, almost always have all three.
What to look for:
Humectants — Glycerin, Hyaluronic Acid, Sodium Hyaluronate, Urea, Panthenol
Occlusives — Petrolatum, Dimethicone, Shea Butter, Squalane, Mineral Oil
Emollients — Ceramide NP/AP/EOP, Jojoba Oil, Caprylic/Capric Triglyceride
If at least one from each category appears near the top of the ingredient list, the product is doing its basic job.
Formulation: Gel, Lotion, Cream, and Balm
Gel: High water content, lightweight, absorbs quickly, minimal sheen. Weak occlusive effect. Best for oily or acne-prone skin.
Lotion: A lighter oil-in-water emulsion. Balanced moisture and hydration. Good for normal or mildly combination skin.
Cream: Higher oil content than lotion, richer and thicker. Stronger moisturizing and occlusive effect. Best for dry skin or winter use.
Balm: Almost entirely oil and wax — the heaviest format. Maximum occlusion. Best for very dry skin in the evening routine, or targeted application to extremely dry spots.
Choosing by Skin Type
Dry skin — Cream or balm. Adequate humectants and occlusives. Ceramides are a bonus. Apply generously, morning and evening.
Oily skin — Light gel or lotion. Humectant-forward; avoid heavy occlusives. Non-comedogenic labeling is helpful. And yes, oily skin still needs a moisturizer. Sebum and skin moisture are not the same thing.
Combination skin — Start with a light lotion. Apply the same product to your whole face but calibrate the amount — less on the T-zone, more on the cheeks.
Sensitive skin — Simple formula. No fragrance, no alcohol. Ceramide- or panthenol-containing products support barrier repair.
When and How Much
Apply while the skin is still slightly damp after cleansing — humectants can attract the remaining surface moisture before it evaporates. Waiting too long means more moisture has already gone.
Less than you think is enough. A thin, even layer across the face is sufficient. More doesn’t compound the effect. Anything that doesn’t absorb ends up on your pillow.
You can go richer in the evening. Skin cell regeneration is more active during sleep, and there’s no concern about shine. Many people use a lighter lotion in the morning and a heavier cream at night.
In Chapter 6, we get to the step most people skip — and the one with the best-documented evidence of any single product in skincare: sunscreen.
Chapter 6. Sunscreen: The Most Important Anti-Aging Product
If there’s one product in skincare with the most solid scientific backing, it’s sunscreen.
Retinol is good. Vitamin C is good. Peptides are good. But all of those are working to improve or slow down damage that’s already happening. Sunscreen is different: it prevents the biggest single driver of visible skin aging before it starts. Dermatologists call it the most underrated anti-aging product in existence.
The problem is that sunscreen comes last in the routine. Last step is the most skipped step. Running late? Leave it out. This chapter should make that harder to justify.
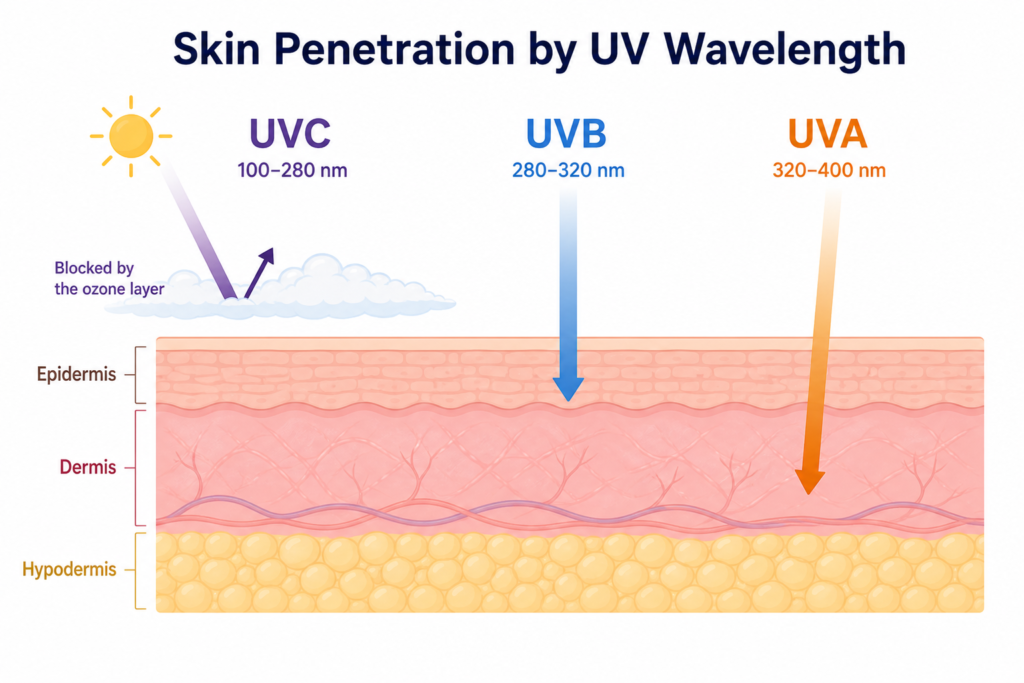
Types of UV Radiation: UVA, UVB, UVC
UVC has the shortest wavelength and the most energy. Almost all of it is absorbed by the ozone layer. It doesn’t reach ground level in meaningful amounts, so it’s not relevant to skincare.
UVB reaches the epidermis. It causes sunburns — the primary culprit. It directly damages skin cell DNA, raising the risk of skin cancer. It’s weaker on cloudy days and in winter, though not absent. Glass blocks most of it.
UVA has the longest wavelength. It passes through clouds and glass. It reaches you year-round, indoors and out. It penetrates into the dermis, breaking down collagen and triggering melanin production. It’s the main cause of wrinkles, sunspots, and skin sagging. It doesn’t cause the immediate burn sensation that UVB does, which makes its danger easier to overlook. When it comes to skin aging, UVA is the real problem.
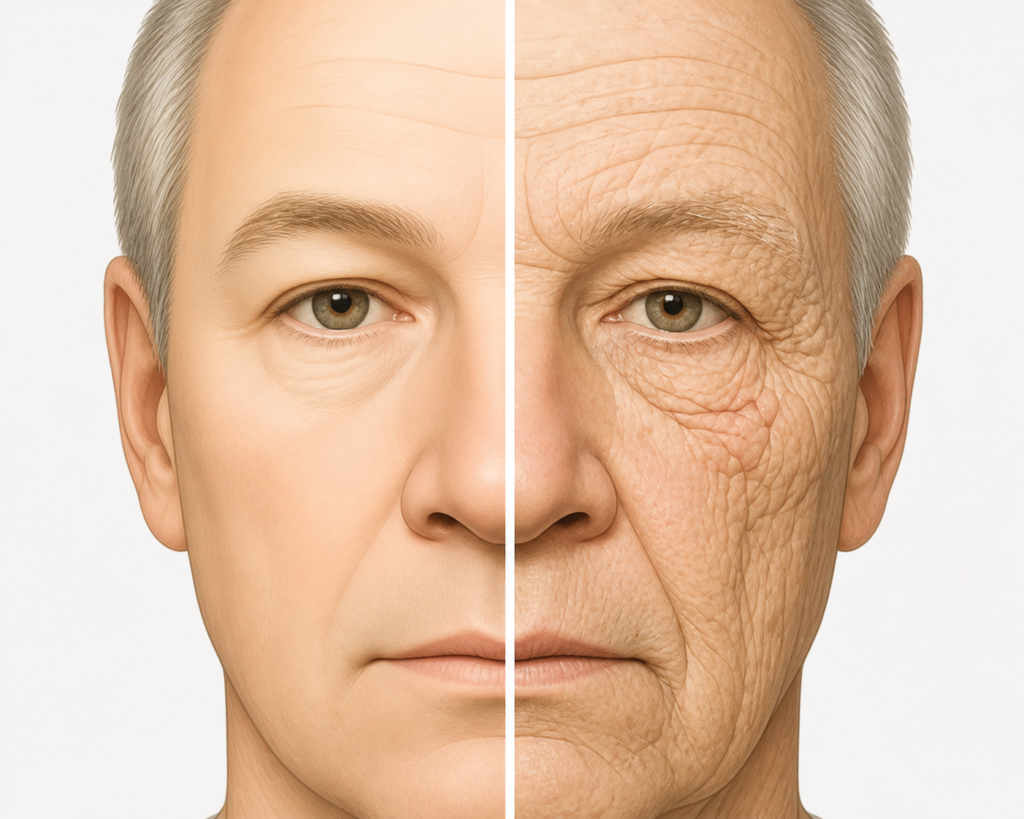
There’s a well-known case study in dermatology: a man who drove a truck for 28 years. Photos show his face — and the left side, closer to the driver’s window, is dramatically more aged than the right. The glass blocked UVB. It didn’t block UVA. One photo makes the case for indoor sunscreen use better than any amount of explanation.
SPF and PA: What the Numbers Mean
SPF (Sun Protection Factor) measures UVB protection. The number represents how much longer it takes for protected skin to burn compared to unprotected skin — SPF 30 means 30 times longer, SPF 50 means 50 times.
Don’t translate that into hours — UV intensity changes constantly based on time of day, weather, and location. The more useful number is the blocking percentage. SPF 30 blocks about 97% of UVB. SPF 50 blocks about 98%. SPF 100 blocks about 99%. The gap closes as the numbers go up. The practical difference between SPF 30 and SPF 50 is small. SPF 30 or above is sufficient.
PA (Protection Grade of UVA) is primarily used on Asian products. More plus signs mean stronger UVA protection — PA++, PA+++, PA++++. American products use “Broad Spectrum” instead, which indicates protection against both UVA and UVB.
Two things to confirm when choosing a sunscreen: SPF 30 or above, and either Broad Spectrum or PA+++ or higher. Both of those, and you have the basics covered.
Chemical vs. Physical Sunscreens
Chemical filters absorb UV radiation and convert it to heat. Because they absorb into the skin to work, they feel lighter and don’t leave a white cast. Applying before going out gives more stable protection, though they do offer some protection immediately after application. Common actives include Avobenzone, Oxybenzone, and Octinoxate. Some research has raised questions about hormonal disruption from certain chemical filters, but current evidence doesn’t support that they’re harmful at normal use levels. They can occasionally irritate sensitive skin.
Physical (mineral) filters work by scattering and partly absorbing UV at the skin’s surface. Only two ingredients qualify: Zinc Oxide and Titanium Dioxide. They’re effective immediately upon application and are gentler on sensitive skin. The downside is white cast — a visible pale layer, especially noticeable on darker skin tones. Nano-particle technology has reduced this in many modern formulas.
Which is better? There’s no universal answer. The best sunscreen is the one you’ll actually use every day. The world’s most effective SPF 50 sitting on your bathroom counter provides zero protection.
How Much to Apply: The Two-Finger Rule
Amount matters. Applying too little means the rated SPF isn’t what you’re actually getting.
SPF testing uses 2mg per square centimeter of skin. For your full face, that’s more than most people apply. The standard recommendation: squeeze sunscreen across two fingers (index and middle) from tip to first knuckle and apply that to your face and neck. This is called the two-finger rule.
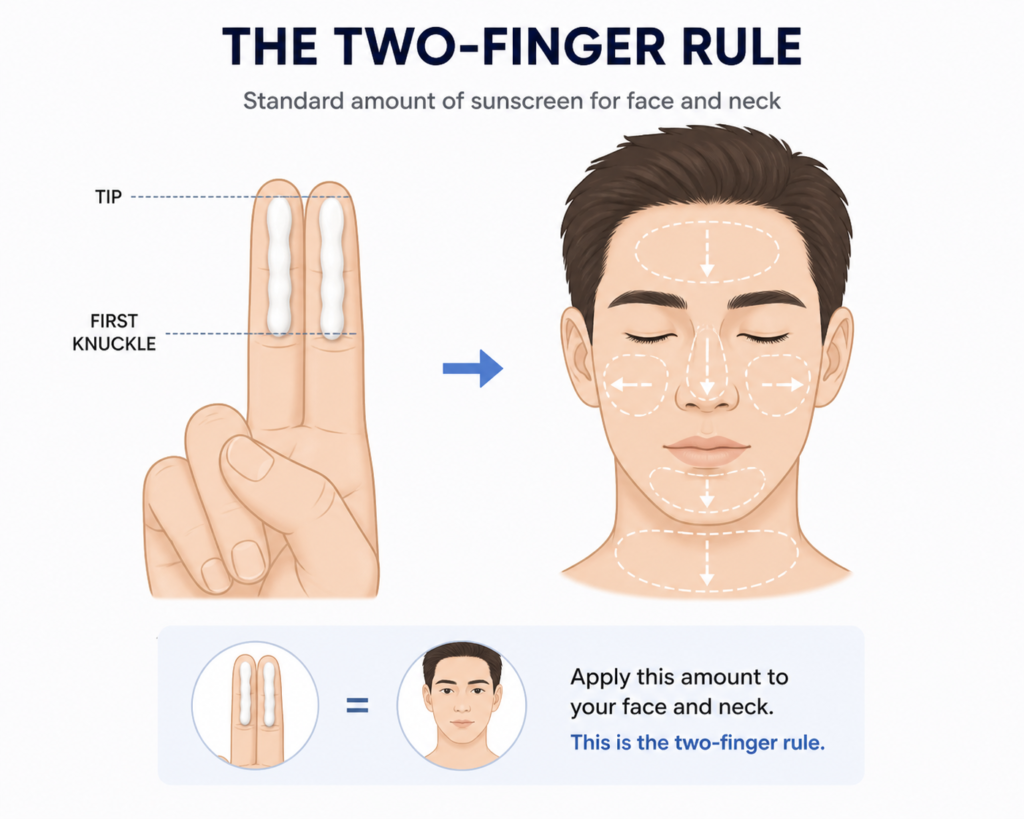
Most people apply roughly half that. SPF drops steeply with under-application — not proportionally. The relationship is exponential. No matter how high the SPF number, too little product means too little protection. Apply enough.
Choosing Sunscreen by Skin Type
Dry skin — Cream formula with added moisturizing ingredients. Physical filters tend to be less drying.
Oily skin — Lightweight gel or water-based formula. Non-comedogenic labeling helps. Chemical filters are typically lighter.
Combination skin — Light lotion. Minimal shine, whether chemical or physical.
Sensitive skin — Physical filters, fragrance-free. Zinc oxide alone is the gentlest option.
Do You Need Sunscreen Indoors?
Short answer: if you sit near a window, yes.
UVA passes through glass. Working at a desk by the window means continuous UVA exposure throughout the day. If you’ve absorbed the truck driver photo, this question answers itself.
Deep indoors with no windows nearby, and you’re not going outside at all? The UVA risk is minimal. But for anyone with a commute or occasional outdoor exposure, building the daily sunscreen habit means you’re always covered regardless.
Reapplication: A Realistic Approach
Sunscreen protection doesn’t last forever. Chemical filters break down as they absorb UV; physical filters get washed off by sweat or sebum. If you’re outside, reapplying every two hours is the standard recommendation.
In practice, reapplying over a full face isn’t easy. Sunscreen sticks are the most convenient reapplication format; powder sunscreens also exist. If you spend most of your day indoors and are only briefly outdoors in transit, the priority for reapplication drops. When perfect reapplication isn’t possible, making sure the morning application is sufficient and thorough is the first priority.
Sunscreen offers the most reliable return on investment of any single skincare step. It doesn’t need to be expensive, and it doesn’t need exotic ingredients. SPF 30 or above, Broad Spectrum, enough product. Three things.
Chapter 7 covers the optional fourth step — treatments — for those who’ve mastered the basics and want to go further.
Chapter 7. Treatment: Add Only If You Need It
If you’ve made it here, you’re already doing 80% of what skincare can do for you.
Cleansing without disrupting the barrier, locking in moisture with a moisturizer, blocking UV damage with sunscreen. Those three steps alone will produce visible improvement for most people. Treatment is for those who want to go further.
Treatment is not required. Let’s be clear about that up front. Adding treatment on top of an unstable basic routine is interior decorating before the foundation is poured. Get the basics solid first.
What Treatment Is: How It Differs from the 3 Steps
If cleanser, moisturizer, and sunscreen are maintenance, treatment is improvement.
The active ingredients from Chapter 3 are what we’re talking about here. Treatment is the step dedicated to delivering those actives directly to the skin — for specific concerns like wrinkles, hyperpigmentation, acne, or uneven skin tone. Products sold as serums, ampoules, toners, or essences with meaningful active ingredients count as treatments.
Focus on what’s inside, not what it’s called. A “hydrating serum” with no active ingredients is just a moisturizer with a different label. An ampoule without functional actives isn’t a treatment. The name on the package is irrelevant — what matters is what’s in it.
Retinol: The Best-Documented Anti-Aging Ingredient
If you had to name the ingredient category with the most robust scientific evidence in skincare, it would be retinoids. Retinoids are among the most extensively studied ingredients in dermatology, with decades of clinical research supporting their effects.
Retinol is the most common form found in over-the-counter products. Few ingredients in the skincare world have this level of evidence behind them.
How it works
Retinol is a derivative of vitamin A. When absorbed by the skin, it converts to retinoic acid and gets to work. It accelerates cell turnover, renewing the stratum corneum. It stimulates collagen production in the dermis. It suppresses melanin formation, improving hyperpigmentation. It also helps clear pores.
Wrinkle reduction, firmness, skin tone, acne — it’s rare for a single ingredient to have evidence across all of these.
Starting out
Retinol is potent. An adjustment period is normal when starting — some dryness, flaking, and mild redness. This is called the retinol reaction, or colloquially, “retinoid ugly.” Mild dryness and flaking during early weeks are an expected part of adapting. Severe stinging, burning, or persistent redness are irritation signals — reduce frequency or stop.
Start with a low concentration — around 0.1% is a reasonable entry point for OTC retinol. Begin with 1 to 2 applications per week and increase frequency as skin adjusts. Use only in the evening — retinol degrades in UV light. And be more diligent about sunscreen when using retinol: accelerated cell turnover means the new skin is more UV-sensitive.
Avoid during pregnancy. High-dose vitamin A derivatives carry documented risks to fetal development.
Retinol vs. Retinal vs. Tretinoin
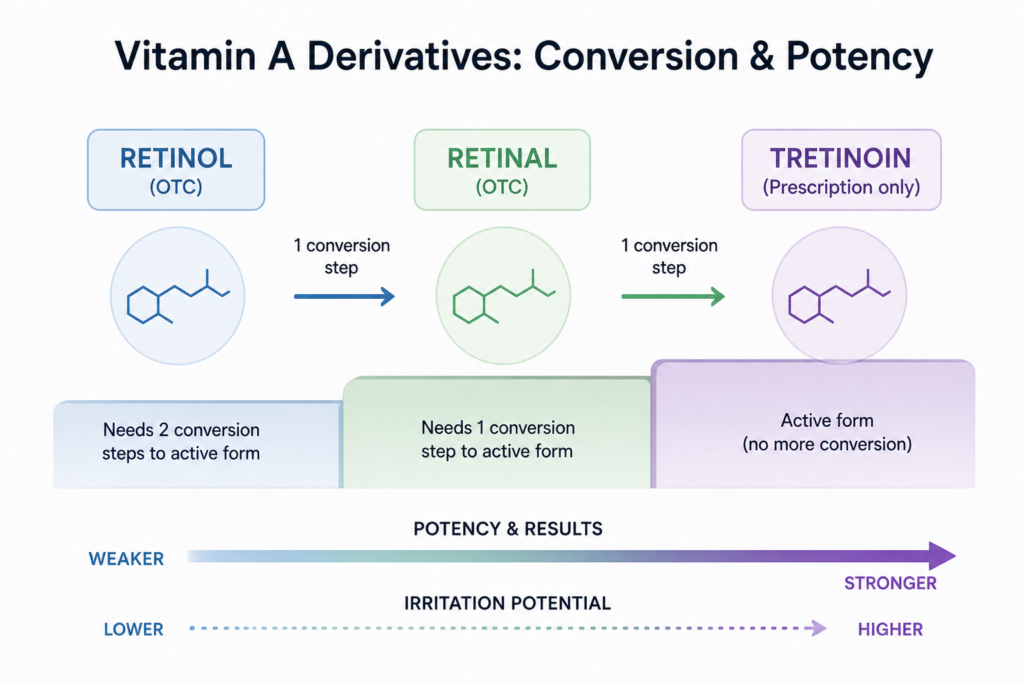
All vitamin A derivatives, but with different potency. Retinol is the most common OTC form. Retinal (retinaldehyde) is one conversion step closer to the active form, so it works faster. Tretinoin is the fully active form — the strongest, and prescription-only in the US. Fastest results but also highest irritation potential. If you’re starting out, retinol or retinal is the practical entry point.
Vitamin C: Antioxidant and Brightening
Vitamin C is one of the most widely sold treatment actives in skincare — and one of the most chemically unstable. Topical vitamin C provides antioxidant protection and has been shown to improve signs of photodamage.
How it works
The most active form is ascorbic acid (L-AA). It does two main things.
First, antioxidant defense: it neutralizes free radicals generated by UV exposure, pollution, and oxidative stress. Free radicals degrade collagen and damage cells. Vitamin C intercepts that process. Used alongside sunscreen, it amplifies UV protection synergistically.
Second, melanin suppression: it inhibits tyrosinase, the enzyme responsible for melanin synthesis, improving existing hyperpigmentation and slowing the formation of new spots. Erasing existing pigmentation entirely is difficult, but gradual fading is achievable with consistent use.
The stability problem
Ascorbic acid oxidizes on exposure to air, light, and heat. Oxidized vitamin C loses its effect and can leave a yellowish stain on skin. If a product turns brown or orange, it’s gone. Throw it out.
Choose dark glass packaging. Use within 3 to 6 months of opening. Refrigeration helps. If that’s too much to manage, stabilized vitamin C derivatives — Ascorbyl Glucoside, Sodium Ascorbyl Phosphate — offer better shelf stability, though they’re generally less potent than pure ascorbic acid. A tradeoff.
AHA/BHA: A Better Approach to Exfoliation
Some people manage skin texture by scrubbing with a gritty exfoliant. It feels satisfying in the moment. The issue is the product and frequency. Coarse, irregular particles — walnut shell powder, apricot seed — can cause micro-tears in the skin and are best avoided. Gentler physical tools like cleansing brushes or konjac sponges are different, and as skin ages and cell turnover slows, they can occasionally be useful when chemical exfoliation alone doesn’t fully clear loosened cells.
Chemical exfoliants work differently. They dissolve the bonds between dead skin cells, allowing them to shed naturally — no physical friction required.
AHA (Alpha Hydroxy Acid) is water-soluble. It works at the stratum corneum surface, loosening the bonds between dead cells, improving texture and evening skin tone. Key examples: Glycolic Acid (smaller molecule, faster penetration, stronger effect) and Lactic Acid (milder, more suitable for sensitive skin). AHAs increase UV sensitivity — use in the evening and apply sunscreen in the morning.
BHA (Beta Hydroxy Acid) — specifically Salicylic Acid — is oil-soluble. Because it’s miscible with sebaceous lipids inside hair follicles, it can penetrate pores and clear out trapped oil and dead cells more effectively than water-soluble AHAs. Anti-inflammatory properties also make it useful for acne-prone skin.
Start at low concentration, 1 to 2 times per week. Increase frequency as your skin adjusts. AHA and BHA can be used on the same day, but starting both at once often produces too much irritation. Introduce them separately.
Niacinamide: The Multi-Tasker
Niacinamide is currently one of the most ubiquitous active ingredients in skincare — a form of vitamin B3 with research across multiple functions.
It strengthens the skin barrier. It regulates sebum production. It inhibits the transfer of melanin to the stratum corneum, improving hyperpigmentation. It has anti-inflammatory effects that calm acne. Research also suggests it can make pores appear less prominent.
Low irritation potential, compatible with most skin types, and plays well with other actives — retinol, vitamin C, AHA/BHA. Relatively inexpensive. Comparatively few drawbacks, though high-concentration formulas can cause flushing or stinging in some skin types.
A common claim: niacinamide and vitamin C should never be used together. This originates from older research and isn’t well-supported by evidence at the concentrations used in modern cosmetics. Products combining both exist widely.
The Order and Principles of Introducing Treatments
The temptation is to buy retinol, vitamin C, AHA, and niacinamide all at once and start using them tomorrow. Then a week later, your skin is in revolt.
Introduce one at a time. Add one new active, wait at least 2 to 4 weeks, assess the response, then add the next. When something goes wrong, having only one variable makes the cause identifiable.
A suggested order, assuming the basic 3-step routine is stable:
Start with niacinamide. It’s the lowest irritation risk and works for the widest range of skin types. If acne or hyperpigmentation is the primary concern, it’s a strong first choice.
After that, the order depends on your main concern. Anti-aging → retinol. Skin tone and brightening → vitamin C. Texture and pore management → AHA or BHA.
Layering: The Right Order When Using Multiple Products
The basic rule: thinnest to thickest consistency.
A typical evening routine:
Cleanser → Toner (optional) → Niacinamide serum → Retinol → Moisturizer
Vitamin C is typically used in the morning. Its antioxidant properties support protection against UV and environmental damage throughout the day.
Morning routine example: Cleanser (or water rinse) → Vitamin C serum → Moisturizer → Sunscreen
AHA or BHA in the evening; avoid using on the same night as retinol initially — both are active enough to cause irritation together. Wait until skin is adapted before combining them.
Treatment is skincare’s bonus round. It’s valuable — but only on top of a solid base. Work up to it, one ingredient at a time. Skin is not a laboratory.
The next part takes everything covered so far and shows how to actually build a routine.
Part 3. Building Your Routine
Chapter 8. The Core Routine: Start with 3 Steps
Part 2 covered the basic 3 steps — cleanser, moisturizer, and sunscreen — and the optional fourth, treatment. Now it’s time to assemble them.
One thing first: routines don’t need to be complicated. Ten-step internet routines, twelve-product morning tutorials from famous YouTubers — you’re not obligated to replicate any of that. Three steps done consistently will beat a complicated routine done sporadically. Skin responds to the right steps, not to how many.
Core Principles
Consistency is everything. The best skincare routine for men is the one you actually do every day. A simple 3-step routine done daily outperforms a perfect 10-step routine done every other day. Skin responds to repetition, not occasional effort.
Morning and evening have different goals. Morning is defense — protecting skin from the UV, pollution, and dry air it’ll encounter through the day. Evening is recovery — removing what accumulated and supplying what the skin needs while it regenerates overnight. Even using the same products, understanding the purpose shifts how you think about each step.
Start simple. Too many products at once makes it impossible to know what’s working and what isn’t. Build the 3-step base, let skin stabilize, then add from there.
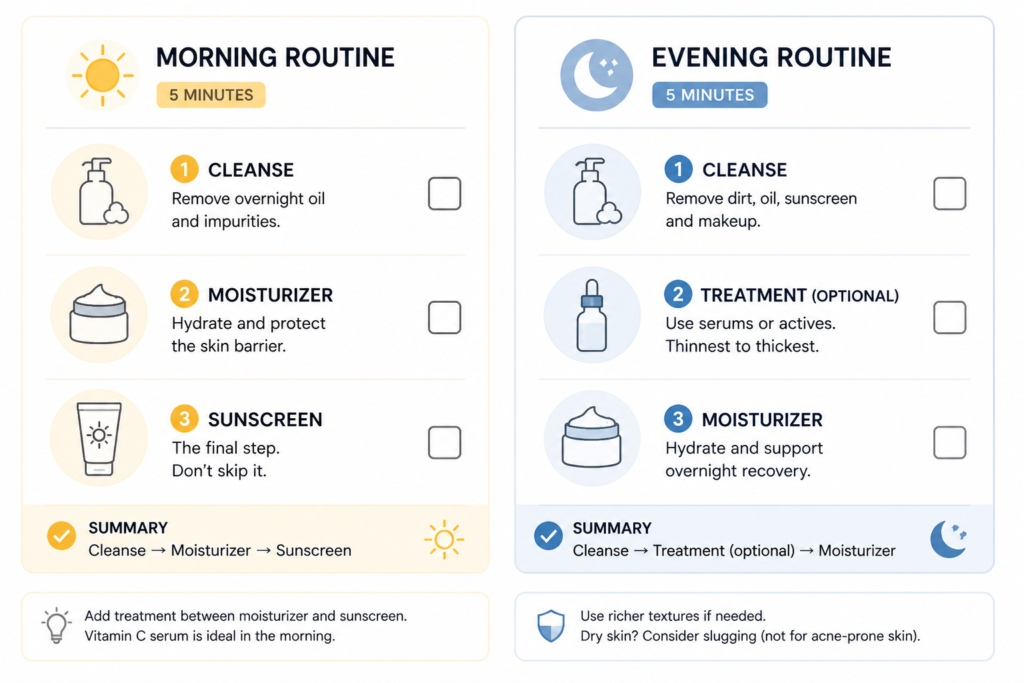
Morning Routine: 5 Minutes
The morning routine’s defining endpoint is sunscreen. A morning routine without sunscreen isn’t finished.
Step 1. Cleanse. Overnight sebum and metabolic byproducts need to come off. Oily skin types: use a pH-balanced cleanser. Dry or sensitive skin: water alone is often sufficient — if you cleansed thoroughly the night before, there’s little reason to cleanse again with product in the morning. If skin feels tight or reactive, start with just water.
Step 2. Moisturizer. Apply while the skin still has some moisture from washing. A lighter formula in the morning — sunscreen goes on top, and a heavy moisturizer can interfere with sunscreen adhesion.
Step 3. Sunscreen. After the moisturizer has absorbed. Remember the two-finger rule — you need more than you think. If using a chemical filter, applying before heading out gives more stable protection, though some protection is present immediately. White cast is a concern? Try a chemical filter or a nano-particle mineral formula.
Morning routine summary: Cleanse → Moisturizer → Sunscreen
If adding treatment, it goes between moisturizer and sunscreen. Vitamin C serum is a natural morning treatment — its antioxidant effect compounds with sunscreen’s UV protection.
Evening Routine: 5 Minutes
More flexibility in the evening — treatment can come out, and richer textures are fine.
Step 1. Cleanse. The most important cleanse of the day. A full day’s accumulation — debris, sebum, sunscreen — needs to come off. If you wore high-SPF sunscreen or any makeup, consider double cleansing: oil or balm cleanser first to dissolve oil-based residue, then a water-based cleanser to finish. A light day? Single cleanse is enough.
Step 2. Treatment (optional). Clean skin, then treatment. Retinol, AHA/BHA, niacinamide serum — whatever you’re using. Thinnest to thickest. Avoid using retinol and AHA/BHA on the same night at first.
No treatment? Skip this step and go straight to moisturizer.
Step 3. Moisturizer. Richer than your morning formula is fine. Skin regeneration is more active overnight, and shine isn’t a factor. Dry skin: cream. Oily skin: a lighter lotion is sufficient. Very dry conditions: apply a thin layer of petrolatum over the moisturizer — this is called slugging, and the occlusive effect significantly reduces overnight moisture loss. Note: not ideal for acne-prone skin, as it can trigger breakouts.
Evening routine summary: Cleanse → Treatment (optional) → Moisturizer
Practical Advice for Getting Started
Building a men’s skincare routine doesn’t require a medicine cabinet full of products.
Buy only 3 things to start. A mildly acidic cleanser, a moisturizer, and sunscreen. Spend at least a month using only these. When the routine feels stable and habitual, add one treatment.
You don’t need to spend a lot. CeraVe, Neutrogena, and La Roche-Posay are available at drugstores, are well-formulated, and are consistently recommended by dermatologists. No reason to start with premium products when you’re still figuring out what your skin responds to.
Don’t expect fast results. The skin cell cycle is roughly 28 days. Meaningful changes from a new routine take at least 4 to 8 weeks to become visible. Two weeks isn’t enough time. If breakouts increase significantly within two weeks, that’s a signal — remove one thing at a time to find the cause.
Sequence matters less than doing it. If you occasionally mix up the order or feel too tired to do it perfectly, do it anyway. An imperfect routine done every day beats a perfect one done occasionally.
That’s the core routine. Cleanse, moisturize, protect, repeat. Chapter 9 takes the same framework and adapts it to each skin type.
Chapter 9. Men’s Skincare Routine by Skin Type
Chapter 8’s routine is the starting point for everyone. The framework — cleanser, moisturizer, sunscreen — is the same regardless of skin type. What changes is which products in each step, and how you use them.
Apply the skin type you identified in Chapter 2. If you’re still unsure, go back to the bare face test before continuing.
Dry Skin Routine
Dry skin’s core problem is twofold: insufficient ability to hold moisture, and a barrier that lets moisture escape. Every decision in the routine should address both.
Morning
Water rinse is often enough. The overnight sebum that builds up acts as a natural protective layer for dry skin — washing it off isn’t always necessary. If cleansing is needed, choose a cream or milk-type cleanser with a mild pH.
Apply moisturizer while skin is still slightly damp. A cream with both humectants (glycerin, hyaluronic acid) and emollients (ceramides, shea butter) is appropriate. Avoid gel-type moisturizers for dry skin — they bring moisture in but don’t seal it effectively, which can leave skin drier than before in low-humidity environments.
Choose a cream sunscreen with added moisturizing ingredients. Avoid sunscreens with alcohol — they compound dryness.
Evening
Use a mild, cream-type cleanser. If you wore sunscreen with significant SPF, consider an oil cleanse first.
Go richer with the moisturizer than in the morning. If skin is particularly dry or it’s winter, a thin layer of petrolatum (slugging) on top of the moisturizer is worth trying. Concerned about greasiness? Apply only to the driest spots — around the eyes, the cheeks.
Recommended treatments for dry skin
Don’t reach for a scrub when skin flakes — it damages the barrier further. A gentle AHA like lactic acid, 1 to 2 times per week in the evening, manages flaking without friction. Niacinamide supports barrier function and works well for dry skin.
Oily Skin Routine
The biggest trap with oily skin is overcorrecting — cleansing aggressively, skipping moisturizer, and using alcohol-based products to tighten things up. That approach dries the skin out and can prompt even more oil production as a compensatory response. The goal is balance, not stripping.
Morning
Use a pH-balanced gel cleanser. Foam is fine too, but avoid strong surfactants. If skin feels tight afterward, the cleanser is too harsh.
Moisturizer: lightweight gel or lotion. Oily skin still needs moisture — sebum and skin hydration are different things. Non-comedogenic labeling is worth checking.
Sunscreen: a light, matte-finish formula. Chemical filters tend to feel less heavy. If your sunscreen is making skin look oilier, the product is wrong — not the category.
Evening
Same cleanser. Double cleansing isn’t necessary daily for oily skin if you haven’t worn heavy makeup and wore a light sunscreen.
Keep the moisturizer as light as the morning formula. No need to go richer just because it’s nighttime.
Recommended treatments for oily skin
Niacinamide has the most research behind it for sebum regulation. It’s the strongest first choice for oily skin. BHA (salicylic acid) targets pores from the inside — 2 to 3 times a week in the evening for pore management. Retinol has also shown some sebum-regulating effects in research. Introduce it after niacinamide and BHA have proven stable.
Combination Skin Routine
Combination skin means living with two different skin types on the same face — oily in the T-zone, dry or normal on the cheeks. A single routine has to satisfy both.
Morning
A mild gel or light foam cleanser with pH balance. Enough for the T-zone without irritating the cheeks.
Start with a lightweight lotion. Apply the same product everywhere, but modulate: a thinner application over the T-zone, a more generous one on the cheeks. Zone-specific products are an option later on, but starting simple is easier.
Light lotion sunscreen for the whole face.
Evening
Same cleanser. Double cleansing if SPF use was significant.
Slightly richer moisturizer than the morning, focused on the cheeks. The T-zone usually manages fine with the same amount as the morning.
Recommended treatments for combination skin
Niacinamide is the most versatile option — it manages T-zone oil while supporting the barrier on drier areas. AHA helps with texture; test it on the cheek area first to gauge sensitivity before applying everywhere.
Sensitive Skin Routine
The guiding principle for sensitive skin: less is more.
Fewer products, simpler formulas, minimal irritation. The urge to keep adding things when skin isn’t improving is the main enemy. Restraint is half the work.
Morning
Water rinse or the gentlest cream cleanser you can find. No fragrance, no alcohol, minimal ingredient count.
A moisturizer with ceramides and panthenol — barrier-strengthening ingredients. Patch test every new product before applying to the full face.
Physical sunscreen: zinc oxide or titanium dioxide. Chemical filters are more likely to cause irritation in sensitive skin. Fragrance-free first.
Evening
Same gentle cleanser. If double cleansing is needed, use the least irritating balm you can find.
A slightly richer moisturizer. The evening is for barrier recovery.
Recommended treatments for sensitive skin
Honestly: don’t introduce treatments until the 3-step routine is completely stable. Adding retinol or AHA to a sensitized routine is a fast path to a worse situation.
When the basics are solid, niacinamide is the gentlest entry point — start at low concentration, 2 to 3 times per week. For retinol, the lowest available concentration, once a week, with realistic expectations about how long the adjustment takes.
One-line summary for each type: Dry skin → replenish and seal. Oily skin → balance without stripping. Combination skin → modulate by zone. Sensitive skin → do less, go slower.
Chapter 10 moves from skin type to specific skin concerns.
Chapter 10. Problem Skin: Targeted Approaches
Skin type is something you’re born with. Skin problems are different. Acne, hyperpigmentation, redness, shaving irritation — these can show up in any skin type, and each has its own cause and approach.
One note before getting into it: everything here is a general skincare perspective, not a clinical prescription. Persistent or severe symptoms warrant a dermatologist, not more products.
Acne-Prone Skin: Understanding the Real Cause
The most common myth about acne: it’s caused by being dirty. So people wash more aggressively. The result is almost always worse skin.
What actually causes acne
Four factors interact:
- Pore blockage. Dead skin cells clog the opening of pores, trapping sebum inside.
- Excess sebum production. Androgens stimulate sebaceous glands to overproduce.
- C. acnes proliferation. Trapped sebum creates an oxygen-poor environment, and C. acnes — which thrives in such conditions — overgrows.
- Inflammation. The immune system responds to the overgrowth, producing red, swollen lesions.
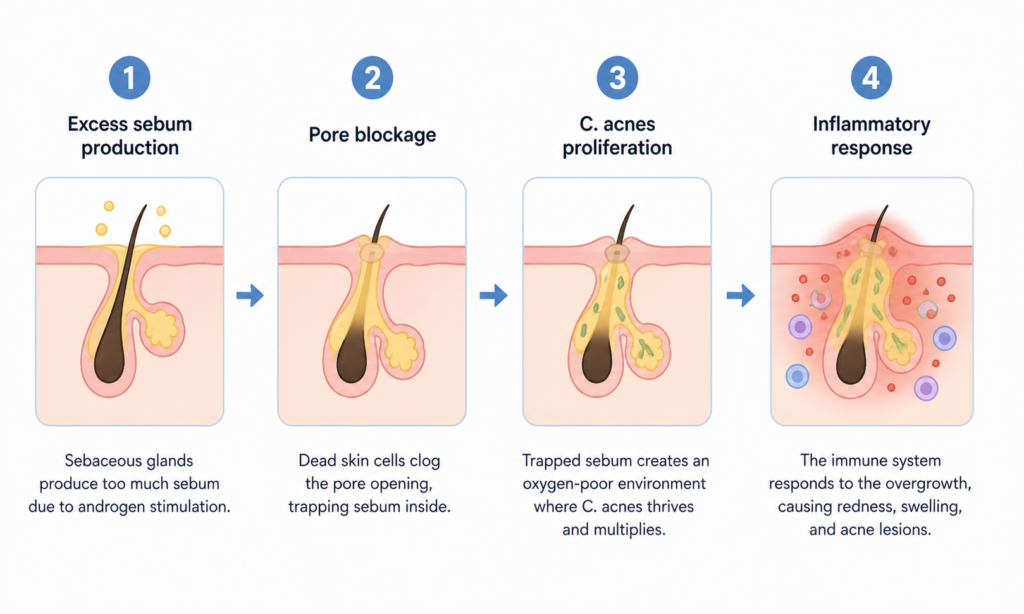
Of these four, cleansing directly addresses only surface debris and excess sebum. The rest require the right ingredients.
Skincare approach for acne-prone skin
Cleanse twice a day with a pH-balanced gel cleanser. More than that damages the barrier and worsens acne. Wash gently with hands and pat dry. Scrubbing over active acne spreads inflammation.
Don’t skip moisturizer. Hydration matters even with acne. Non-comedogenic, oil-free.
Two treatments carry the strongest evidence: Salicylic acid (BHA) penetrates pores and clears sebum and debris — use at 0.5 to 2% concentration in the evening. Niacinamide addresses inflammation and sebum. Compatible with salicylic acid.
Benzoyl peroxide directly kills C. acnes. It’s powerful, but also irritating. Start at 2.5%. It bleaches fabric, so be aware.
The one thing to avoid
Squeezing with your fingers. The momentary relief is real. The inflammation spreading and the scar it leaves are also real. Hands carry bacteria. Pressing them into inflamed skin is adding fuel to fire.
Hyperpigmentation and Dark Spots: Causes and Approach
You look fine in the bathroom mirror. But under bright light, there’s a patchwork of uneven tone — post-acne marks, sunspots, dark spots from shaving irritation.
Why it happens
Hyperpigmentation is excess melanin deposited in specific areas. Three main causes:
UV exposure — UVA stimulates melanocytes to produce more melanin. Post-inflammatory hyperpigmentation (PIH) — after acne, wounds, or shaving trauma, the skin overproduces melanin as a protective response. Hormonal — melasma is the classic example.
Approach
The most reliable prevention is sunscreen. Existing hyperpigmentation deepens with continued UV exposure. Using brightening actives without sunscreen is pouring water into a bucket with a hole in it.
Two treatments are central: Vitamin C inhibits the melanin synthesis enzyme, slowing new pigment formation and gradually lightening existing discoloration. Apply in the morning before sunscreen. Niacinamide prevents melanin from transferring into the stratum corneum. Compatible with vitamin C.
AHA accelerates stratum corneum turnover in areas of hyperpigmentation — consistent use leads to gradual lightening.
Results take time. A minimum of 8 to 12 weeks of consistent use before visible improvement. For faster results, laser or chemical peels at a dermatologist’s office are more efficient.
Skin Redness: Rosacea vs. General Sensitivity
Persistent redness around the cheeks and nose, or easy flushing — two possible explanations, and they require different approaches.
General sensitivity-related redness often stems from a damaged skin barrier. A weakened barrier lets irritants in easily, triggering rapid inflammatory responses. Restore the barrier and the reactivity usually improves. Reduce irritating ingredients, add ceramides and panthenol, and stick to a gentle routine.
Rosacea is different. It’s a chronic inflammatory skin condition where the issue isn’t just barrier disruption — blood vessel abnormalities and immune dysregulation are also involved. Characteristic pattern: persistent redness over cheeks, nose, forehead, and chin; visible small blood vessels; papules and pustules that look like acne but without blackheads; flares triggered by UV, hot food, alcohol, or exercise.
Rosacea can’t be cured by skincare. The goal is minimizing triggers and managing symptoms. Gentle routine, physical sunscreen, fragrance-free products. Prescription treatments like metronidazole or azelaic acid are effective; severe cases may require laser. If rosacea is suspected, a dermatologist’s diagnosis comes first. Experimenting with products on suspected rosacea often makes it worse.
Men’s Specific Concerns: Shaving Irritation and Ingrown Hairs
This is where men’s skin care diverges most sharply from women’s. Shaving applies direct physical trauma to the skin’s surface daily or every other day. It’s rare to find a man who hasn’t dealt with shaving-related irritation.
What causes shaving irritation
The razor drags across and disrupts the stratum corneum, creating micro-damage. Insufficient lubrication or irritating shaving products compound the effect. Alcohol-based aftershaves applied to freshly damaged skin add insult to injury — that burning feeling is exactly what it sounds like.
Ingrown hairs occur when a hair grows back into the skin rather than out. Caused by cutting too close to the skin’s surface, or by dead cells blocking the follicle opening. Produces small, red bumps on the neck and jawline.
How to minimize shaving irritation
Shave after showering. Warm water softens hair and opens follicles, so the blade glides more easily.
Use enough shaving cream or gel. Dry shaving is consistently more irritating.
Use sharp, clean blades. Dull blades require more passes, which means more friction. Replace after 5 to 7 uses.
Shave with the grain, not against. Against the grain gives a closer shave but drives ingrown hairs and irritation.
Skip the alcohol aftershave. Use a calming product with niacinamide or ceramides instead — the goal is barrier recovery, not that burning “freshness.”
If ingrown hairs are a recurring issue, try BHA the evening before shaving. It clears the dead cells blocking follicle openings, giving hairs a clearer path out.
Electric vs. safety vs. cartridge razors
In terms of skin irritation: electric razors are the gentlest. Less blade-to-skin contact and shallower cutting. The tradeoff is a less close shave.
Cartridge razors are the most common. Multiple blades stacked together — each blade passes over the same spot in a single stroke. Clean, close shave, but multiple passes of irritation in one motion. If you have sensitive skin or frequent ingrown hairs, fewer blades is better.
Safety razors have a single blade that cuts less deeply and causes less irritation. Learning curve at first, but many people find they have fewer problems after switching.
Skin problems need accurate diagnoses to be treated accurately. Acne isn’t solved by cleansing. Hyperpigmentation can’t be fixed by brighteners alone without sunscreen. Rosacea needs a different approach than general sensitivity. Chapter 11 covers adjusting routines for different seasons and environments.
Chapter 11. Adjusting for Season and Environment
You’ve built a solid routine. Skin is stable. Then a season changes and everything feels off — winter brings constant dryness no matter how much you apply, summer makes oil control feel impossible.
The answer isn’t to rebuild the routine from scratch. Keep the framework intact and adjust the texture and quantity of products. That’s it.
Why Skin Changes with the Seasons
Skin responds to its environment — temperature, humidity, wind, and UV intensity.
Humidity is the biggest variable. When air humidity drops, there’s less environmental moisture for humectants to draw in. They may instead pull moisture from deeper skin layers and accelerate evaporation — especially when used without an occlusive. TEWL increases. This is why a lightweight gel moisturizer that worked fine in summer suddenly feels insufficient in dry winter air or a climate-controlled office.
Sebum production increases with temperature — oily skin gets oilier in summer, and even oily skin types often become drier in winter.
UVB intensity is significantly lower in winter, though UVA changes less dramatically across seasons and remains present year-round — even in winter, even indoors.
Indoor environments also matter. Air conditioning or heating often drops humidity to 30 to 40%. Skin is most comfortable at 45 to 60%. Eight hours in an air-conditioned office affects skin as much as the weather outside.
Spring and Summer Routine
Higher UV intensity, more warmth, more sweat and oil.
Cleanser: if you’ve been using a cream cleanser in winter, consider switching to a gel or light foam. Increased sebum and sweat need adequate cleaning. Just don’t overdo the surfactant strength.
Moisturizer: move from cream to lotion or gel. Maintain hydration but reduce heaviness. Heavy formulas in summer clog pores and trigger breakouts more easily.
Sunscreen: the step that needs the most attention. Higher UV intensity means applying enough is even more critical. Factor in reapplication if you’re spending time outdoors. Water-resistant formulas for heavy sweat days.
Evening cleansing deserves extra attention on days with heavy sunscreen and sweat. Leaving that combination on skin overnight invites pore congestion.
Treatments: AHA or retinol users can continue through summer. Just be more vigilant about sunscreen — both increase UV sensitivity. Evening-only use remains the rule.
Fall and Winter Routine
Lower temperature, lower humidity, less oil — but skin dries out even for oily types.
Cleanser: gel users in summer can switch to cream or milk in fall. The priority shifts from cleansing power to gentleness. Dry and sensitive skin types especially need a gentler winter cleanser.
Moisturizer: upgrade from lotion to cream. Dry skin types can add a petrolatum layer over the cream in the evening (slugging). Pay extra attention to the driest spots — around the eyes and corners of the mouth.
Timing matters more in winter. Apply before skin fully dries after cleansing — water evaporates faster in dry air.
Sunscreen: non-negotiable even in winter. UVA is present year-round. SPF 30 is sufficient when UV intensity is lower. A cream sunscreen with hydrating ingredients is a natural fit for winter.
Treatments: winter is actually a good time to start retinol — lower UV intensity and more time indoors. But dry winter skin makes the adjustment period more pronounced. Start at low concentration and go slowly.
AHA is tempting in winter because dryness produces more flaking. 2 to 3 times per week is appropriate. Over-exfoliating damages a barrier that’s already stressed.
Dry Indoor Environments
Even in good weather, if you’re spending most of your day in climate-controlled spaces, that’s where skin takes the hit.
A humidifier is the most direct solution. Running one in the bedroom during sleep is especially effective — skin regeneration is most active at night, and giving it a stable-humidity environment makes a measurable difference.
From a skincare angle, shifting the evening routine toward more occlusive-heavy products is the practical adaptation. Slugging is most useful under these conditions.
Drinking enough water is worth mentioning. It doesn’t directly hydrate skin in a measurable way, but severe dehydration does affect skin. Adequate hydration is about whole-body function, not a skincare shortcut.
After Exercise
Exercise benefits skin through improved circulation and oxygen delivery. The “detox through sweat” claim is overstated — sweat is mostly water and salt, not toxins.
The problem is leaving sweat and sebum on skin for extended periods, which can clog pores. Equipment like helmets, hats, and masks also create friction and occlusion in specific areas.
Before exercise: if sunscreen is already applied, leave it. No need to cleanse before working out. If the weight of moisturizer and sunscreen in your eyes is an issue, switch to a lighter sunscreen formula.
After exercise: cleanse soon. Salt from drying sweat irritates pores. If a shower isn’t immediately possible, a water rinse buys time. Cleanse properly when you can. Continue the routine normally from there.
For frequent helmet or mask users with breakouts in those areas: apply moisturizer before putting on the equipment. It reduces friction and irritation.
Routines aren’t fixed. When season, environment, or lifestyle changes, skin changes with it. You don’t need to overhaul anything — keep the framework and adjust texture and quantity. Most variations respond to that alone.
Part 4 covers the practical side: how to actually choose, start, and stick with products.
Part 4. Practical Guide: Choosing, Starting, and Maintaining
Chapter 12. Practical Product Selection Guide
At this point you know how skin works, what the ingredients do, and how to structure a routine. Now you need to actually buy things. But standing in front of a Sephora wall or scrolling through Amazon results, it’s easy to lose the thread.
This chapter gives you practical criteria — not brand recommendations, but the framework for making your own decisions. Criteria don’t expire; they apply to whatever product is in front of you.
How Much Should You Spend?
An uncomfortable truth up front: price and effectiveness do not correlate the way most people assume.
Premium products are expensive for many reasons — advanced ingredients, elegant packaging, brand prestige, marketing spend, distribution margin. Only the ingredients reach your skin. A $200 cream and a $20 cream with comparable ingredient profiles aren’t necessarily delivering different results.
That said, “cheaper is always better” isn’t right either. Formulation quality, ingredient stability, and how preservatives and fragrances are handled can differ. But those differences aren’t readable from the price tag — they’re readable from the ingredient list.
A practical starting framework:
Cleanser and sunscreen — spend less. A cleanser rinses off; how long it stays on skin doesn’t give ingredients time to do much. A sunscreen’s effectiveness is more a function of how much you apply than how expensive it is. An inexpensive sunscreen applied generously beats an expensive one applied sparingly.
Moisturizer and treatment — relatively more investment is reasonable. These stay on skin and ingredient concentration and stability matter more. But the principle still holds: assess the ingredient list, not the price.
Where to Buy
Drugstores (CVS, Walgreens, Target): CeraVe, Neutrogena, La Roche-Posay, Vanicream. Well-formulated, accessible, and consistently recommended by dermatologists. The best starting point for anyone building a new routine.
Beauty specialty stores (Sephora, Ulta): broader range, higher-end options, staff advice available. Go in with a specific product or ingredient in mind — the marketing environment makes impulse decisions easy.
Online (Amazon, iHerb, brand websites): widest selection and easiest price comparison. Reviews are useful but remember they come from people with different skin types. When ingredient lists aren’t visible in the listing, check the brand’s official site before buying.
The Process for Introducing a New Product
Step 1. Patch test. Small amount on the inner wrist or behind the ear. Wait 24 to 48 hours, up to 72 for sensitive skin. No reaction? Clear to use on the face.
Step 2. One at a time. Change only one product at a time. Don’t swap out your whole routine at once.
Step 3. Allow adjustment time. Minimum 2 to 4 weeks. Retinol and AHA/BHA can produce early adjustment reactions — some dryness or mild sensitivity is expected in the first few weeks for these actives specifically. With any product, persistent worsening is a signal to stop.
Step 4. Observe. Is skin improving? Worsening and continuing to worsen? If the latter, the product isn’t compatible. Look at the ingredient list for the likely culprit.
How Long to Wait: Adjustment Timelines by Product
Cleanser / Moisturizer — 1 to 2 weeks. If no irritation, it’s working. Moisturizing effects are often noticeable immediately.
Niacinamide / Vitamin C — 4 to 8 weeks. Pigmentation and tone changes take time. If there’s no irritation, keep going.
AHA/BHA — 2 to 4 weeks. Some initial sensitivity or increased flaking is normal early on.
Retinol — 4 to 12 weeks. The longest adjustment period. Some dryness, flaking, and mild redness in the first 4 weeks is expected. Push through it. Too much? Reduce frequency before giving up entirely.
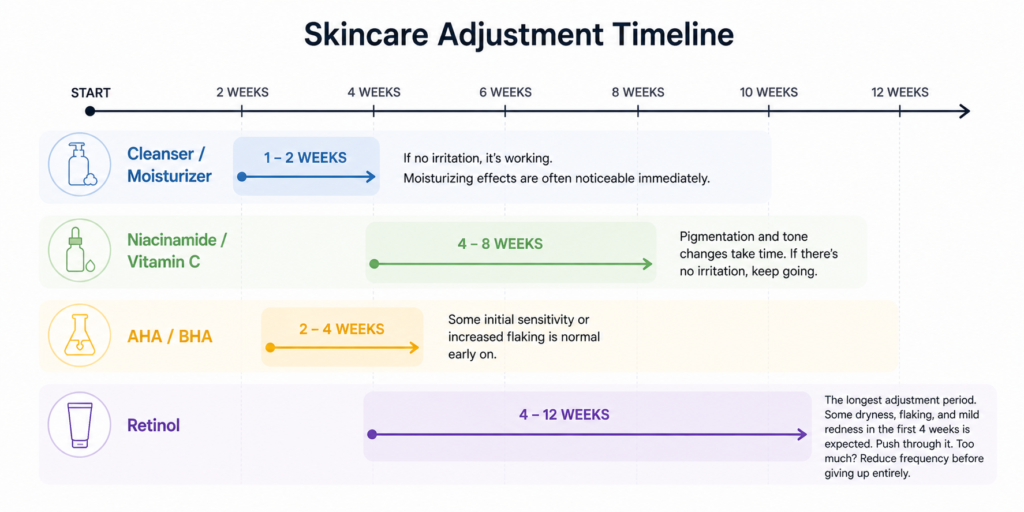
Ingredient List Checklist
What to check for any product:
What are the first five ingredients? Are the key functional ingredients near the top? Is there fragrance — and if so, is it compatible with your skin type? Is alcohol (Alcohol Denat.) high on the list? If non-comedogenic matters to you, is it labeled as such? Note: “non-comedogenic” isn’t a regulated term — it’s a reference point, not a guarantee.
Additional checks for treatment products:
Is the concentration of the key active listed? Retinol 0.1%, niacinamide 5%, salicylic acid 2% — transparent brands label this. If it’s not on the packaging, check the brand’s website.
For AHA/BHA, pH matters. These exfoliants work in the pH 3 to 4.5 range. If a brand doesn’t publish pH information, that’s a limitation worth noting.
How to Read Reviews and Recommendations
Online reviews and YouTube recommendations are useful references, not gospel.
The reviewer’s skin type may not match yours. A five-star rave from someone with oily skin doesn’t predict how your dry skin will respond. A good review specifies skin type and the concern it addressed — not just “this product is great.”
Influencer recommendations may be sponsored. US law requires disclosure, but disclosed or not, the objectivity of the recommendation isn’t guaranteed. The ingredient list doesn’t care who endorsed the product.
A 4.8-star product isn’t automatically right for your skin. A lower-rated product might be perfect for your specific type. You’re not the average consumer.
Product selection gets easier as the criteria become second nature. Read the list, match the formula to your skin type, introduce one at a time, wait long enough. Those four habits will hold up against whatever’s new on the shelf. Chapter 13 covers the mistakes that derail this process.
Chapter 13. Common Mistakes
Have you started a skincare routine only to find skin getting worse? Putting in effort but seeing no results? Most of the time, it’s not the products. It’s the approach.
These mistakes are universal. Beginners make them. People who’ve been doing skincare for years make them. If any of these sound familiar, fixing them will do more than buying a new product.
Over-Cleansing
The belief that more cleansing = cleaner skin. Washing after workouts, after going outside, after lunch, whenever it seems oily. Three times a day, four times.
Skin doesn’t share this belief.
Repeated washing constantly disrupts the barrier. The lipids don’t have time to recover before the next wash. The acid mantle can’t rebuild. The microbiome gets knocked out of balance. The results: dryness, sensitivity, breakouts.
For oily skin especially: scrub, feel clean for an hour, then skin rebounds with more oil. Strip the oil, skin compensates by making more. The cycle continues.
Twice a day — morning and evening — is the baseline. Additional cleansing is only warranted after significant sweating or physical activity. Even then, water alone is often sufficient.
Using Too Many Products at Once
One at a time. Chapter 12 covered this, but it’s worth repeating here because it’s one of the most common mistakes.
Build the 3-step base and keep it stable for a month before adding a treatment. When one treatment proves compatible, add the next. Too many products at once makes it impossible to isolate causes when something goes wrong.
More products doesn’t mean better skin. Ingredient overlap or cumulative irritation can push skin past its tolerance. A daily skincare routine for men doesn’t need ten steps.
Skipping Sunscreen
“I’m staying in today.” “It’s overcast.” “I’m just too lazy.”
Chapter 6 covered this thoroughly — brief version:
UVA passes through clouds, windows, and indoor environments. It’s the primary driver of visible skin aging. The combined effect of retinol, vitamin C, and niacinamide can’t match what daily sunscreen use prevents.
If laziness is the main obstacle, it’s a habits problem. Put sunscreen directly next to the moisturizer so your hand reaches for it automatically. The goal is zero decision points in the routine.
Giving Up on a Product Too Early
Two days in, no visible change. A week later, skin hasn’t transformed. Moving on to the next product.
Skin cell turnover is roughly 28 days. Meaningful results from a new routine or ingredient take at least 4 to 8 weeks. Retinol can take up to 12. Stopping at two weeks is stopping before the experiment can produce data.
How to tell the difference between an adjustment period and actual incompatibility:
Normal adjustment (specific to retinol and AHA/BHA): some dryness and flaking in the first 2 to 4 weeks with retinol; mild sensitivity or redness in the first 1 to 2 weeks with AHAs. This is expected for these specific actives, not for all products.
Stop immediately: severe itching, hives, persistent burning, swelling. These are allergic or intolerance reactions. Pull the product.
When it’s ambiguous: reduce frequency and observe for two more weeks. Still no improvement? Then stop.
Misidentifying Your Skin Type
Covered in Chapter 2, but it belongs in this list too. A wrong skin type diagnosis misdirects every product choice from the start.
Two common misreads:
Thinking you’re dry when you’re actually oily. Post-wash tightness gets interpreted as dryness, but it may be a harsh cleanser stripping oil from fundamentally oily skin. Applying a rich cream made for dry skin onto oily skin clogs pores and causes breakouts.
Thinking you’re oily when you’re actually dry. The skin produces more oil as a compensatory response to a damaged barrier and moisture loss. Using only lightweight oily-skin products doesn’t fix the underlying dryness.
Not sure? Run the bare face test from Chapter 2 again. If you’ve switched to a gentler cleanser since the last test, redo it — the cleanser influences the result.
Adding More Products When Skin Suddenly Gets Worse
A breakout happens. The response: a calming mask, spot treatment, new serum. Add more to fix it.
The correct move is the opposite.
When skin suddenly gets worse, strip the routine back to basics: just the cleanser, a gentle moisturizer, and sunscreen. Give the barrier time to recover. After 1 to 2 weeks of stability, reintroduce products one at a time. The one that triggers a return of symptoms is the culprit.
Resisting the instinct to intervene is harder than it sounds — but consistently more effective.
Over-Exfoliating with Physical Scrubs
Flaking skin, so the response is aggressive scrubbing — gritty exfoliants 3 to 4 times a week. Feels smooth immediately. Two days later: red, reactive skin. More scrubbing follows.
Coarse, irregular particles in many physical scrubs can cause micro-tears. Frequent use keeps the barrier in a perpetually disrupted state. Gentler physical tools used at appropriate frequency are different, and occasional use can be useful — especially as skin ages and cell turnover slows. But the default recommendation for managing texture is to shift to chemical exfoliants.
AHA or BHA dissolves the bonds between dead cells and allows them to shed naturally — no friction required. It takes adjustment, but once skin stabilizes, going back to scrubs feels unnecessary.
Judging Results Only by Mirror
Checking the mirror every day for improvements. Yesterday looked the same. No effect. Quitting.
Changes invisible to daily observers are visible in comparison photos. When starting a new routine, photograph skin under the same lighting and angle. Repeat every two weeks. Eight weeks of photos tell a clearer story than daily mirror-checks.
Sensory cues are often ahead of visual ones: Does skin feel less tight after washing? Are breakouts less frequent? Is texture more even? These shifts register before they’re visible.
Expecting Skincare to Fix Everything
The last mistake is about expectations.
Skincare effectively maintains skin health and slows aging. What it can’t do is offset chronic sleep deprivation, sustained stress, poor diet, smoking, or excessive alcohol. Skin reflects whole-body condition.
If a solid routine isn’t producing results, the place to look might not be the products. An extra hour of sleep or reducing alcohol intake may do more for skin than adding another serum. The expensive serum companies don’t love that statement. It’s true anyway.
If any of these mistakes resonated, start with fixing those rather than buying something new. Removing what’s wrong consistently does more than adding what’s right.
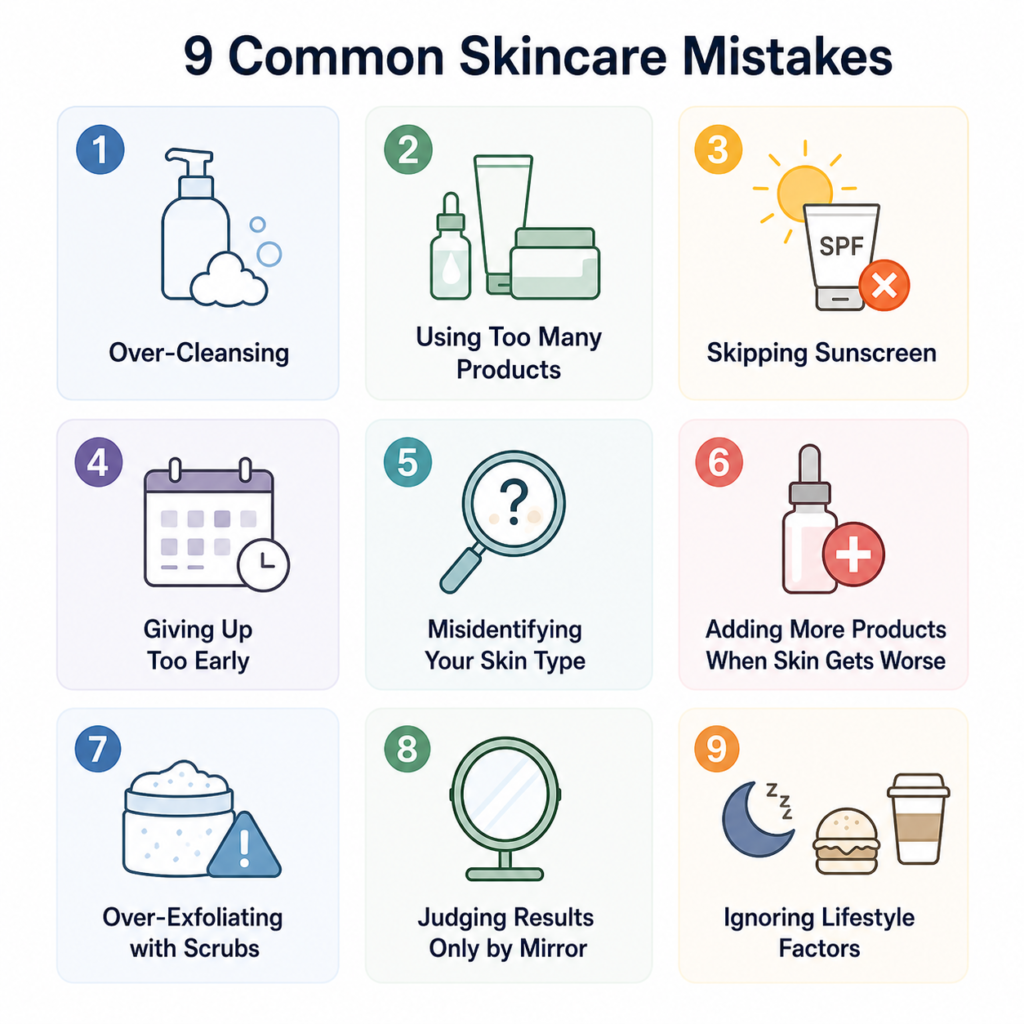
FAQ
Do Men Need to Do Skincare?
Less of a “need” question and more of a “why wouldn’t you” question.
Skin — regardless of sex — gets damaged by UV exposure, loses moisture, and changes with age. Men’s skin does have differences from women’s: it’s thicker, produces more sebum, and is subject to specific stressors like daily shaving. But the core logic — cleanse, hydrate, protect from UV — applies equally.
The idea that skincare is for women is cultural, not biological. Your skin doesn’t know your gender. UV radiation definitely doesn’t.
When Should You Start Skincare?
Now.
In your 20s: prevention is the goal. Skin may look fine, but UV damage accumulates invisibly. A consistent sunscreen habit now shapes what skin looks like at 40.
In your 30s: prevention and maintenance together. Collagen production has begun declining. Adding retinol to the core routine is worth considering.
Past 40: let go of the idea that it’s too late. Skin responds to care at any age. Starting now is better than not starting.
The best time was ten years ago. Second best is now.
Do You Need a Toner?
Depends on what you mean by toner.
The original purpose of a toner was to rebalance pH after washing with alkaline soap. If you’re using a mildly acidic cleanser, that problem doesn’t exist and that type of toner is redundant.
But modern toners are diverse. Hydrating toners with humectants. Exfoliating toners with AHA or BHA. Treatment toners with niacinamide or other actives. These products are functionally serums or treatments wearing the “toner” label.
Bottom line: you don’t need the category. You might need the ingredients. Apply the same rule as everything else — read the list, not the label.
What’s the Difference Between Serum, Ampoule, and Essence?
Marketing terms. No standardized legal or scientific definitions exist.
Different brands use the same format and call it different things. Essence is primarily a K-beauty term; the texture sits somewhere between a toner and a serum.
Loose working definitions: serum = concentrated actives in a lightweight formula; ampoule = more concentrated than a serum; essence = lighter than a serum. But these vary by brand.
It doesn’t matter. Name is irrelevant — ingredient list is everything. Whatever it’s called, what counts is what’s in it and whether it’s present in meaningful amounts.
Are Expensive Products Actually More Effective?
Not as a rule.
Price includes many things beyond ingredients: packaging, brand equity, marketing, margins. Only the ingredients reach your skin.
Better products do exist at higher price points — more stable formulas, higher-concentration actives, proprietary technology. But those differences show up in the ingredient list and brand-published data, not in the price tag.
CeraVe moisturizer is around $15. It contains ceramides, hyaluronic acid, and cholesterol, and is among the most consistently dermatologist-recommended moisturizers available. A product ten times the price has no guaranteed advantage.
Dermatology Procedures vs. Skincare Products: Which Is More Effective?
Different tools for different purposes.
Skincare products work primarily at the stratum corneum and epidermis level. Some ingredients — certain retinoids — can influence the dermis indirectly. The goal is prevention, maintenance, and gradual improvement. Results are real but not dramatic or fast.
Dermatological procedures — laser, chemical peels, botox, fillers, microneedling — reach the dermis directly. Results are faster and more pronounced.
For significant hyperpigmentation, deep wrinkles, or acne scarring, skincare alone may not achieve the desired outcome. A dermatologist consultation is often more efficient in those cases.
But procedures don’t replace a daily routine — they build on it. A procedure-improved complexion still needs consistent daily skincare to maintain results. These aren’t competing options; they’re complementary.
When Do You See Results from Skincare?
Depends on what you’re looking for.
Immediate changes: switching to a mildly acidic cleanser removes post-wash tightness immediately. A moisturizer makes skin feel different as soon as it’s applied.
Structural changes take longer: barrier stabilization takes 4 to 6 weeks. Hyperpigmentation improvement, 8 to 12 weeks. Retinol effects, 12 weeks or more.
Most reliable method: photograph skin at the start under consistent lighting and angle. Compare at 8 weeks. Daily mirror-checking misses changes that photos reveal.
My Skin Suddenly Got Worse — What Do I Do?
Strip the routine back to basics first. Remove all treatments. Keep only the cleanser, a gentle moisturizer, and sunscreen. Resist the instinct to add more.
After 1 to 2 weeks of stability, reintroduce products one at a time. When reintroducing something triggers a return of symptoms, that’s the cause.
If the culprit isn’t clear, consider what changed recently — a new product, diet shifts, sleep disruption, stress, seasonal change. Skin reacts to more than just what you apply.
No improvement after 2 weeks, or symptoms worsening — go see a dermatologist. Experimenting with products on a deteriorating situation typically makes things worse.
Closing
If you’ve read this far, you already know more about skin than most people around you.
Why the barrier matters. Why mildly acidic is the right pH. Why sunscreen is the most evidence-backed anti-aging product available. How to read an ingredient list. How to choose products that actually fit your skin.
Knowing this and knowing nothing is a real difference. But knowledge alone doesn’t change skin.
A skincare routine for men doesn’t need to be complicated or expensive. It doesn’t need to be perfect. Start tonight.